Make-Ahead Magic! The Best 5-Day Upma Prep Jars & Breakfast Casserole Recipe
Oh, those frantic weekday mornings! I remember them all too well. Before I discovered the magic of intentional meal prep, my mornings often involved a frantic scramble for something, anything, edible before rushing out the door. My go-to was often a forgotten piece of toast or, if I was lucky, a bowl of cereal.
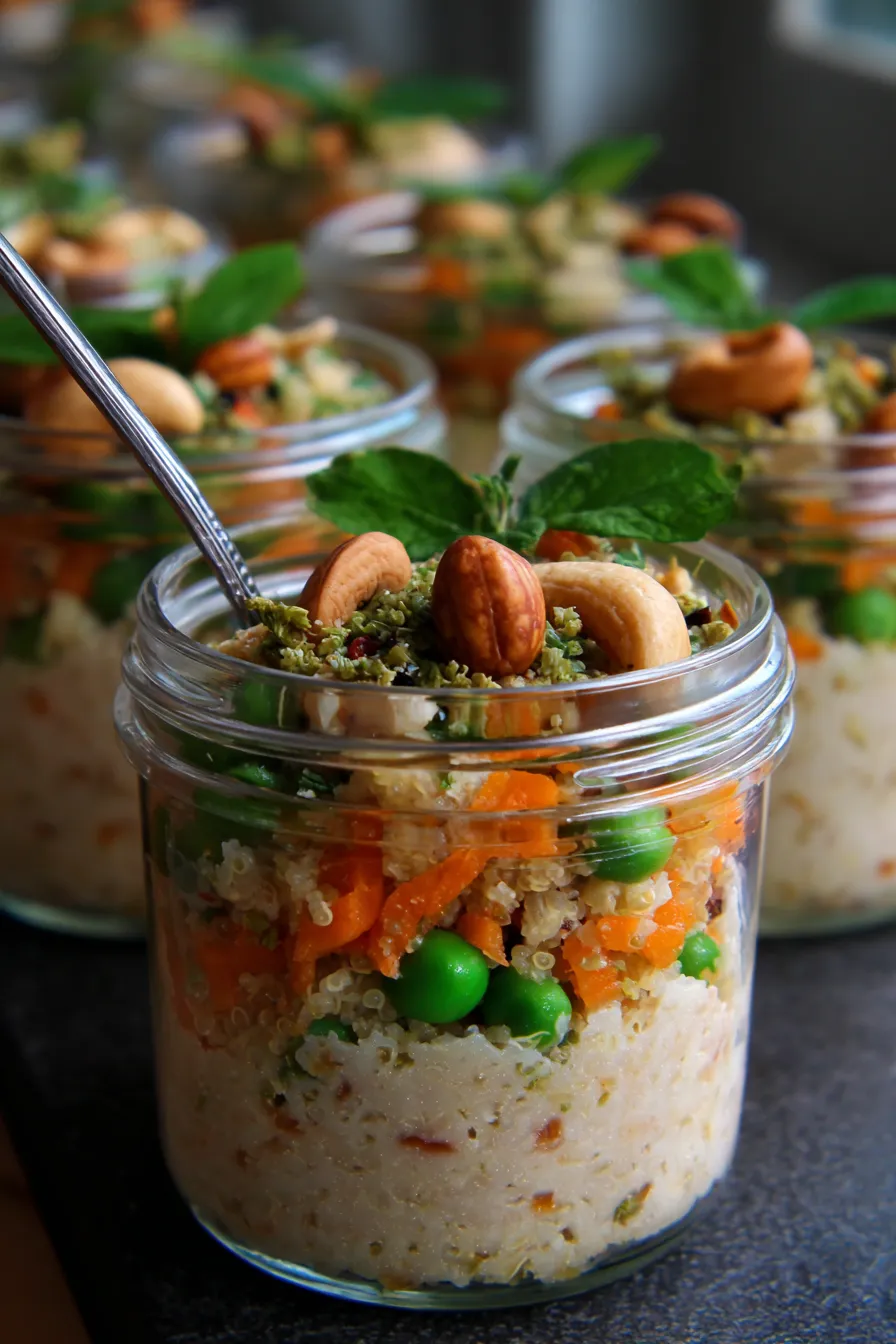
That all changed one dreary Monday when I was staring into the fridge, contemplating another sad desk breakfast. I remembered a conversation with my aunt about her mother’s secret to effortless weekday meals: making a big batch of Upma base on Sunday. Inspired, I decided to adapt her wisdom into something even more convenient for my busy life: the 5-Day Upma Prep Jars | Breakfast Casserole.
Let me tell you, this recipe was a game-changer! It’s an incredibly easy breakfast solution that brings the comforting, savory flavors of traditional Indian Upma right to your breakfast table, even on the busiest days. This healthy meal prep staple has been tested, tweaked, and declared a family favorite, making rushed mornings a thing of the past.
Why You’ll Love This Recipe
❤️ Here’s why these Upma Prep Jars will become your new favorite:
- Effortless Mornings: Say goodbye to morning cooking! With just a few minutes of prep on Sunday, you’ll have delicious, warm breakfasts ready for the entire week. Just add hot water and stir!
- Bursting with Flavor: This isn’t your bland breakfast. Each jar is packed with aromatic spices, fresh vegetables, and the comforting texture of semolina, creating a truly satisfying meal.
- Perfectly Customizable: Whether you love crunchy cashews, a medley of vibrant veggies, or a spicy kick, this recipe is incredibly versatile. Adapt it to your taste buds and whatever fresh produce you have on hand.
- Healthy & Wholesome: Loaded with fiber from vegetables and sustained energy from semolina, these upma jars are a nutritious way to start your day. You control the ingredients, so you know exactly what you’re eating.
- Budget-Friendly: Making your own breakfast saves money compared to daily cafe runs or expensive pre-made options. Upma ingredients are generally inexpensive and widely available.
- Great for Meal Prep: These jars are the epitome of smart meal prep. They store beautifully in the fridge, maintaining their freshness and ensuring you have a healthy option readily available.
- Portable Powerhouse: Ideal for packed lunches or a quick snack on the go. Just grab a jar and you’re set, making healthy eating convenient wherever you are.
- Comforting & Cozy: There’s something so inherently comforting about a warm, savory bowl of upma. It’s a hug in a mug, perfect for chilly mornings or when you need a little pick-me-up.
- Beginner-Friendly: Don’t be intimidated if you’re new to Indian cooking or meal prepping. This recipe is straightforward, with clear steps that even novice cooks can master with ease.
- Reduces Food Waste: By planning your meals for the week, you’re less likely to let vegetables go bad in the fridge. This recipe uses up various bits and bobs of produce wonderfully.
What You Need
You only need a few simple pantry staples and fresh vegetables for these delightful Upma Prep Jars! The beauty of this recipe lies in its simplicity and the ability to use what you have. Check the full printable recipe card below for detailed measurements and a complete list of ingredients.
💡 Expert Tips for Perfect Upma Prep Jars
Here are my top tips to ensure your Upma Prep Jars turn out perfectly every time:
- Roast Your Semolina (Rawa) Properly: This is a crucial step for truly delicious upma. Dry roast the semolina on medium-low heat until it turns a light golden color and becomes fragrant. This prevents stickiness and enhances the flavor. Do not skip this!
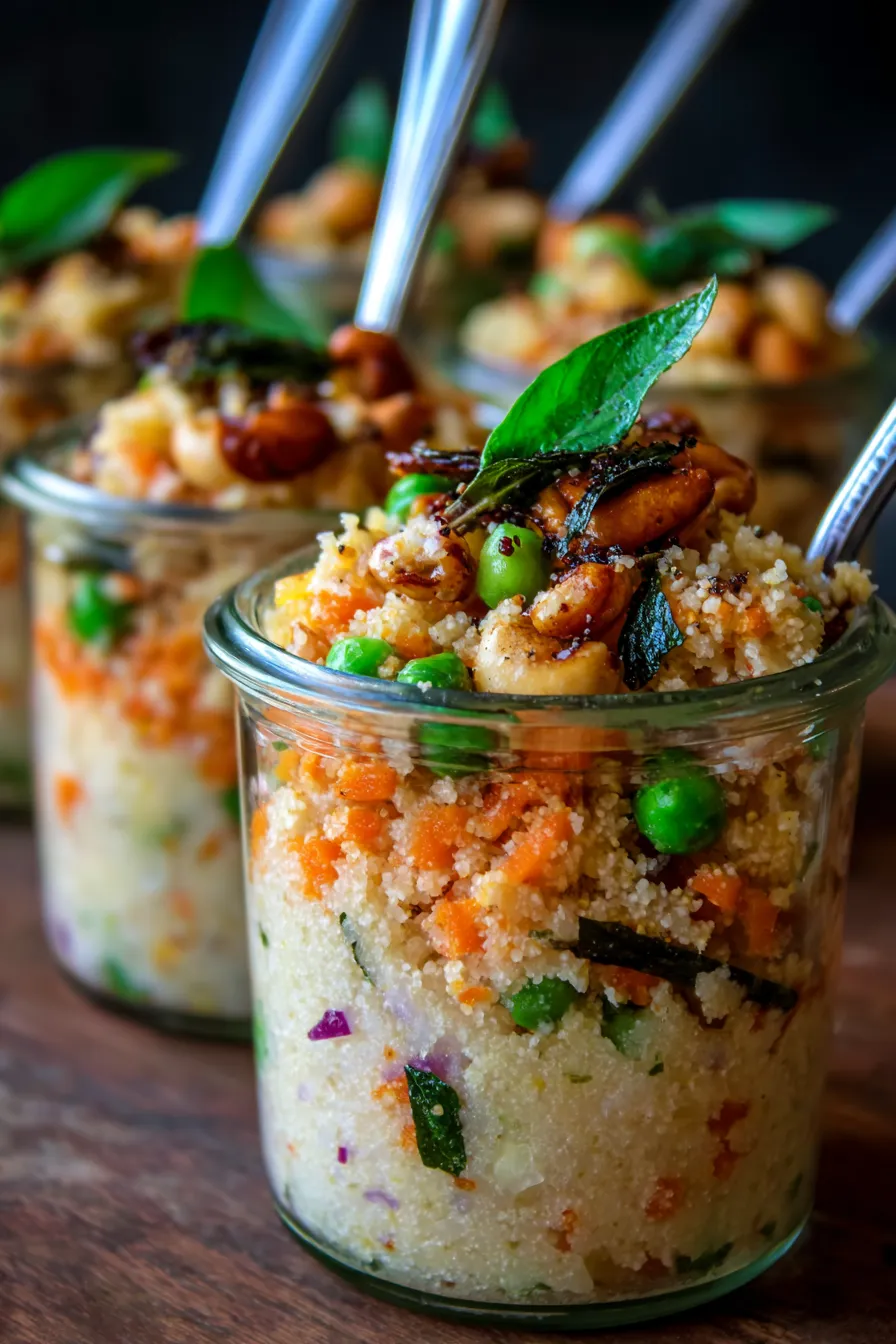
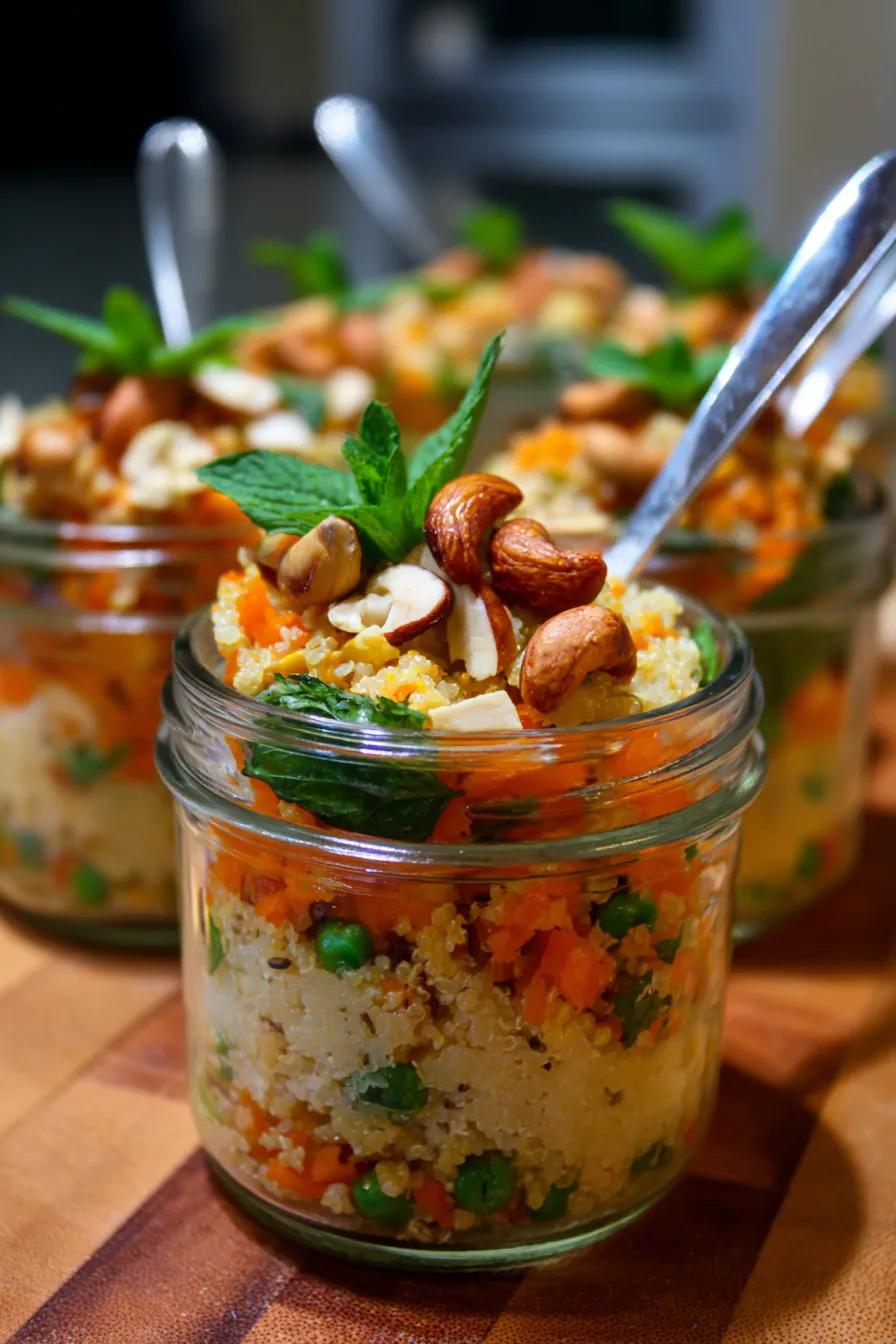
- Layering is Key: For the best results, layer your ingredients strategically in the jars. Start with the cooked, drier ingredients (like roasted semolina and some tempered spices if desired), then add the cooked vegetables, and finally any fresh herbs or nuts on top. This prevents sogginess.
- Don’t Overcook Your Veggies: When prepping vegetables for the jars, cook them until they are tender-crisp. They will soften further when hot water is added, and you don’t want mushy vegetables. Blanching or light sautéing is perfect.
- Tempering (Tadka) for Flavor: The tempering (tadka) is the soul of upma. Don’t skimp on mustard seeds, curry leaves, and a pinch of asafoetida. You can either add a spoonful of this fresh tempering directly to each jar before adding hot water, or you can mix it into your cooked vegetable base.
- Control the Spice: Adjust green chilies and ginger according to your preferred spice level. For milder upma, remove the seeds from the chilies or reduce the quantity. A little finely grated ginger adds wonderful warmth.
- Seasoning Smartly: While you can add a pinch of salt to the prepared veggies, the main seasoning for the upma itself should be done when you add the hot water. This allows you to adjust to taste and ensures an evenly seasoned meal.
- Hot Water is Essential: When it’s time to enjoy, always add *boiling hot* water (or broth). This is critical for rehydrating the semolina and cooking the remaining ingredients to a perfect consistency. Cold water will not work here.
- Stir and Wait: After adding hot water, stir well to combine all ingredients, then cover the jar tightly and let it sit for 5-7 minutes. This allows the semolina to fully absorb the liquid and cook through, resulting in a fluffy texture.
- Garnish Freshly: A squeeze of fresh lemon juice and a sprinkle of chopped fresh cilantro or coriander leaves just before serving makes a huge difference in brightening the flavors. Don’t skip these fresh touches!
- Choose the Right Jars: Use wide-mouthed, heat-proof glass jars (like Mason jars) for easy layering and stirring. Pint-sized (16 oz) jars are usually ideal for a single serving.
Variations & Substitutions
One of the best things about these Upma Prep Jars is how incredibly adaptable they are! Feel free to get creative and make them your own:
- Go Vegan: Easily swap ghee for your favorite plant-based oil (like coconut or vegetable oil) for a delicious vegan version.
- Gluten-Free Option: While traditional upma uses semolina (which contains gluten), you can substitute it with quinoa flakes or millet flakes for a gluten-free alternative. Adjust water ratios as needed, as these grains absorb liquid differently.
- Add Protein: Boost the protein content by adding roasted peanuts, cashews, or even a spoonful of cooked lentils to your jars. Tofu crumbles or paneer pieces also work wonderfully.
- Vegetable Medley: Experiment with different vegetables! Finely diced bell peppers, green beans, corn, spinach, or even grated zucchini can be added. Ensure they are pre-cooked to tender-crisp before jarring.
- Spice It Up (or Down): For extra heat, add a pinch of red chili powder or finely chopped serrano peppers. For less spice, omit the green chilies altogether.
- Sweet & Savory: Some people enjoy a touch of sweetness. A tiny pinch of sugar or a few raisins can be added for a unique twist.
- Broth vs. Water: For richer flavor, use vegetable broth instead of water when rehydrating your upma.
Storage & Freezing
These 5-Day Upma Prep Jars are designed for optimal freshness throughout the week, but proper storage is key!
- Refrigeration: Once assembled, store your sealed jars in the refrigerator for up to 5 days. Ensure the lids are tightly closed to maintain freshness and prevent any odors from permeating.
- Reheating: When ready to enjoy, simply remove the lid, add boiling hot water (or broth) until it just covers the ingredients (about 1 cup per pint-sized jar, but adjust based on ingredients). Stir well, cover tightly, and let sit for 5-7 minutes until the semolina has absorbed the liquid and everything is tender and hot. Stir again and enjoy!
- Freezing: While you *can* freeze the dry ingredients (roasted semolina, spices, nuts) in a freezer-safe bag, I don’t recommend freezing the assembled jars with cooked vegetables. The texture of some vegetables (like potatoes) can become mushy, and the semolina might not rehydrate as well. It’s best enjoyed fresh from the fridge.
FAQ
Q: Can I use instant semolina (fine rawa) for this recipe?
A: Yes, you can use instant or fine semolina, but you’ll need slightly less water and a shorter resting time. Still, dry roasting it lightly will improve the flavor and texture significantly. Coarse semolina generally gives a better, fluffier texture for upma.
Q: How do I prevent my upma from getting soggy in the jars?
A: The key is to keep the liquid separate until serving. Layering dry ingredients at the bottom, using tender-crisp (not overcooked) vegetables, and adding hot water only just before eating prevents sogginess. Also, ensure your semolina is well-roasted.
Q: What are some good vegetable combinations for upma?
A: Classic choices include carrots, peas, and green beans. Other great additions are bell peppers (capsicum), finely chopped cabbage, sweet corn, or even a handful of fresh spinach (add this on top before sealing). Diced potatoes are also popular but ensure they are fully cooked before jarring.
Q: Can I prepare the tempering (tadka) in advance and store it?
A: You can prepare the oil-based tempering with mustard seeds, curry leaves, and urad dal in advance and store it in an airtight container in the fridge for a few days. Then, add a spoonful to your jar before pouring hot water. This saves a step on busy mornings!
Embrace the joy of stress-free mornings with these incredible 5-Day Upma Prep Jars. They truly transform breakfast from a chore into a delightful ritual. Give them a try, and you’ll wonder how you ever lived without them!
If you make this recipe, don’t forget to share your creations and tag me on social media! And be sure to Pin this recipe for later so you can easily find it when meal prep day rolls around.

5-Day Upma Prep Jars | Easy Make-Ahead Breakfast Casserole
Ingredients
- 1 cup coarse semolina (rawa)
- 2 tbsp ghee or oil
- 1 tsp mustard seeds
- 1/2 tsp cumin seeds (optional)
- 1/2 tsp urad dal (split black gram, optional)
- 1/4 cup raw peanuts or cashews
- 1 sprig curry leaves
- 1 large onion, finely chopped
- 1-2 green chilies, slit or chopped (adjust to taste)
- 1 inch ginger, grated or finely minced
- 1 cup mixed vegetables (carrots, peas, green beans), finely diced and par-cooked
- Salt to taste
- Fresh cilantro, chopped (for garnish)
- 1-2 tbsp lemon juice (for garnish)
- Boiling water/vegetable broth (about 1 cup per jar, for serving)
Instructions
- Step 1 Dry roast semolina in a wide pan on medium-low heat until fragrant and lightly golden (about 5-7 minutes). Transfer to a plate and let cool completely. This is crucial for preventing stickiness.
- Step 2 In the same pan, heat ghee or oil over medium heat. Add mustard seeds, and once they splutter, add cumin seeds, urad dal, peanuts/cashews, and curry leaves. Sautu00e9 until peanuts/cashews are golden and dal turns light brown.
- Step 3 Add chopped onion, green chilies, and ginger. Sautu00e9 until onions are translucent and softened (about 5-7 minutes).
- Step 4 Add the par-cooked mixed vegetables to the pan. Sautu00e9 for another 3-5 minutes, allowing flavors to meld. Season with salt to taste. Let the mixture cool slightly.
- Step 5 To assemble the jars: Divide the roasted semolina evenly among 5 wide-mouthed, heat-proof glass jars (e.g., pint-sized Mason jars).
- Step 6 Next, layer the cooled sautu00e9ed vegetable mixture over the semolina in each jar.
- Step 7 If desired, sprinkle a few extra roasted cashews or fresh cilantro on top of the vegetables.
- Step 8 Seal the jars tightly with lids. Store the assembled jars in the refrigerator for up to 5 days.
- Step 9 To serve: Remove lid from a jar. Add boiling hot water or vegetable broth until it just covers the ingredients (approximately 1 cup, adjust as needed). Stir well to combine all layers.
- Step 10 Cover the jar tightly again (you can use the lid or a small plate) and let it sit for 5-7 minutes. This allows the semolina to absorb the liquid and cook.
- Step 11 Uncover, stir again, and add a squeeze of fresh lemon juice and a sprinkle of fresh cilantro. Serve hot and enjoy your easy, delicious breakfast!