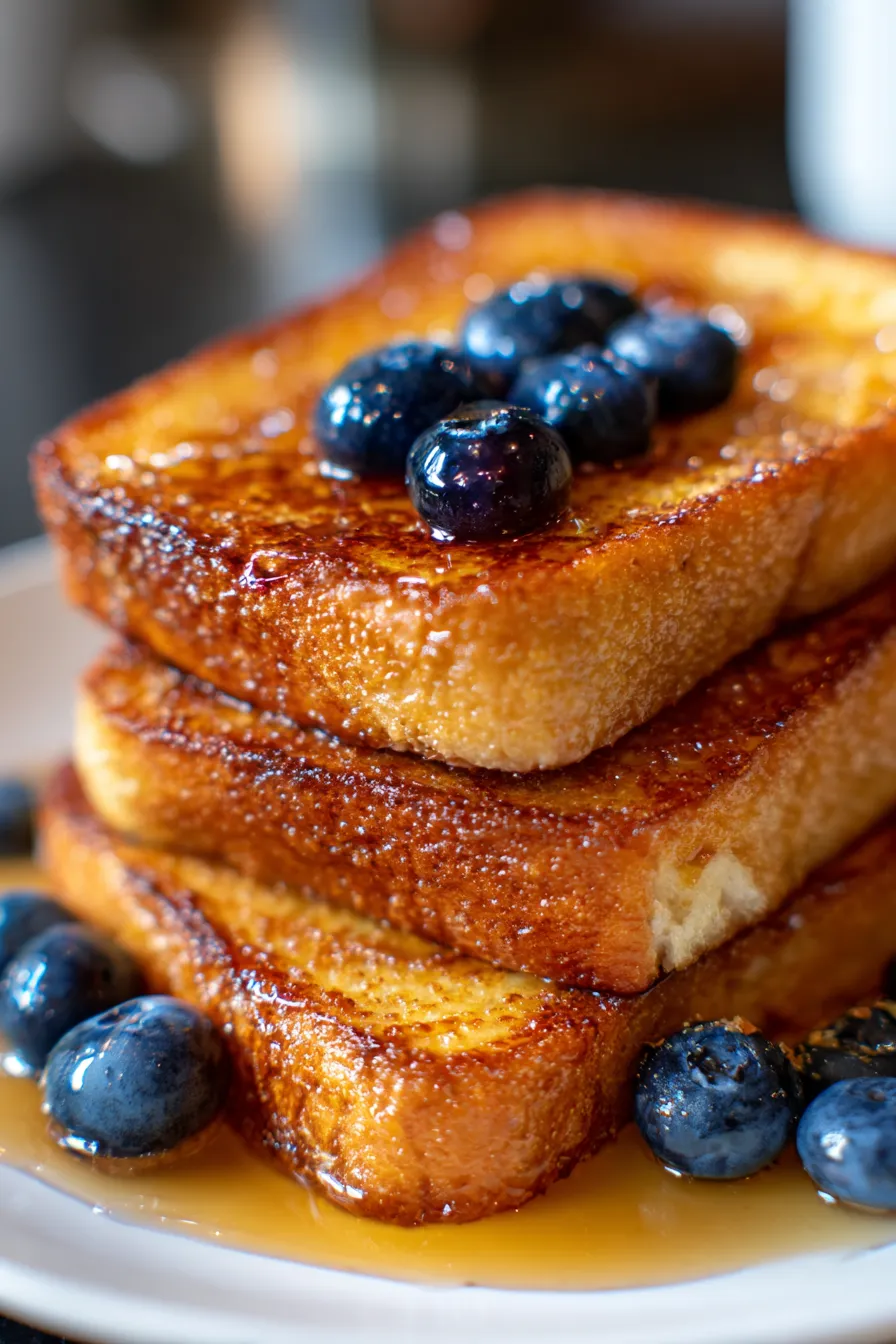
The Ultimate Simple French Toast Recipe for Cozy Mornings
My grandma’s kitchen often smelled of cinnamon and vanilla on Sunday mornings, a scent that still instantly transports me back to happy, carefree days. She had a way of turning simple ingredients into pure magic, and her Simple French Toast Recipe was no exception. It wasn’t fancy, just perfectly golden, custardy slices of bread that made every bite feel like a warm hug. It’s the ultimate comfort food classic, perfect for an easy breakfast that feels truly special.
That same warmth is what I aim to share with you today. This recipe isn’t just a nostalgic favorite; it’s a meticulously tested, family-approved method to create the most incredible French toast right in your own kitchen. You’re about to discover how simple it is to achieve that perfect balance of crisp edges and a creamy, melt-in-your-mouth interior.
Whether you’re a seasoned brunch enthusiast or just looking for a delightful weekend treat, this guide will walk you through every step to ensure your French toast is nothing short of spectacular. Get ready to elevate your mornings!
Why You’ll Love This Recipe
- ❤️ Effortlessly Delicious: Forget complicated steps! This recipe uses common pantry ingredients and straightforward instructions, making it perfect for even beginner cooks. You’ll be amazed at how quickly you can whip up a batch of truly gourmet-tasting French toast.
- Perfectly Custardy Interior: We’ll share the secret to achieving that coveted, rich, and moist texture on the inside, ensuring every bite is a dream. No dry or soggy bread here, just pure, eggy perfection.
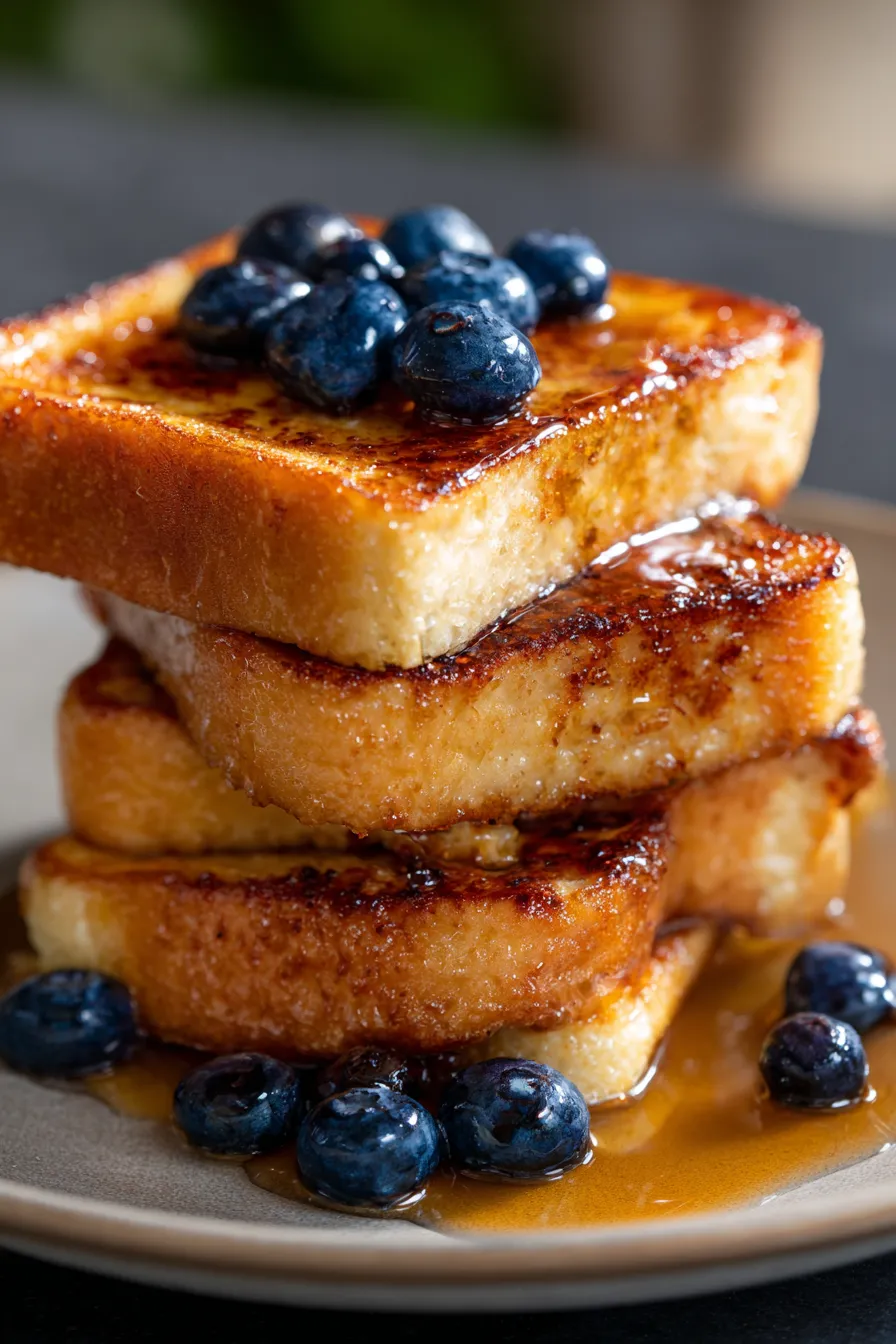
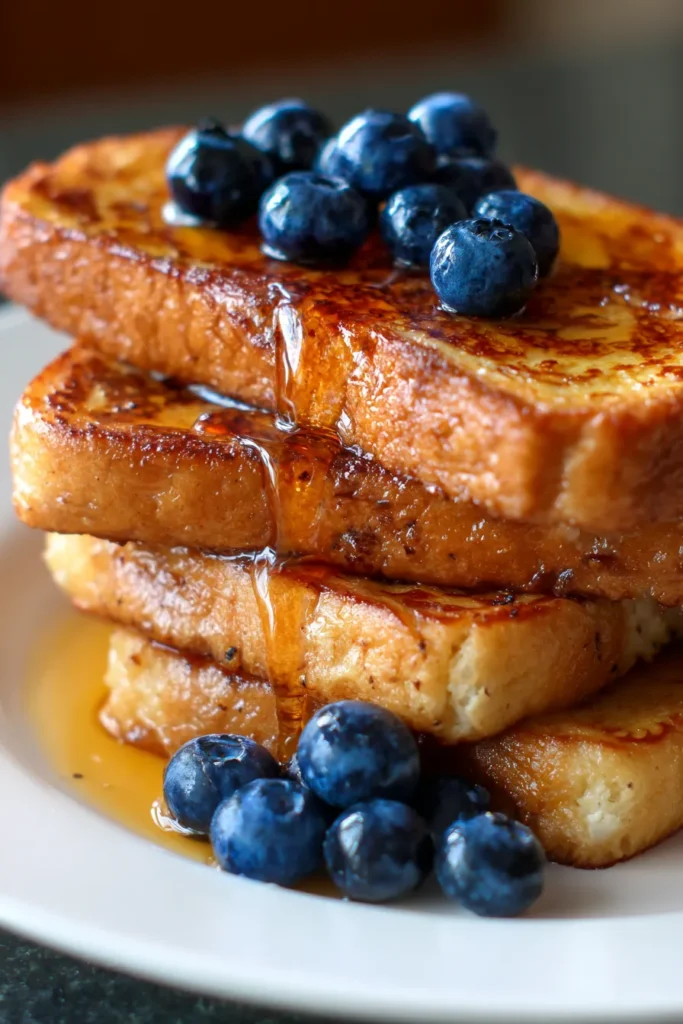
- Golden-Brown Perfection: Learn how to get those beautiful, caramelized, golden-brown edges that are visually appealing and add an irresistible slight crispness to each slice. The color alone will make your family swoon!
- Customizable for Every Craving: This recipe is a fantastic base! Easily adapt it with your favorite spices, extracts, or toppings. From fresh berries to a dusting of powdered sugar, the possibilities are endless to make it uniquely yours.
- Family-Friendly Favorite: A guaranteed crowd-pleaser! Kids and adults alike will beg for this French toast every weekend. It’s the kind of dish that brings everyone to the table with smiles, creating lasting memories.
- Quick & Convenient: Ideal for busy mornings when you want something substantial and satisfying but don’t have hours to spend in the kitchen. From start to finish, you’re looking at minimal prep and cook time.
- Budget-Friendly Ingredients: You likely already have most of the ingredients in your fridge and pantry. No need for specialty store runs; just simple, wholesome staples come together to create something extraordinary.
- Versatile Serving Options: Serve it for breakfast, brunch, or even “brinner” (breakfast for dinner)! It pairs beautifully with bacon, sausage, fresh fruit, or simply a drizzle of maple syrup. It’s truly an all-day delight.
What You Need
You only need a few simple pantry staples for this recipe! Check the full printable recipe card below for detailed measurements.
Expert Tips
- 💡 Choose the Right Bread: This is perhaps the most crucial tip! Brioche, challah, or day-old sourdough are excellent choices. They are sturdy enough to soak up the custard without falling apart and provide a rich flavor. Avoid thin sandwich bread, which can become mushy. Thicker slices (around 3/4 to 1 inch) are ideal for a good custard-to-bread ratio.
- The Perfect Custard Ratio: Don’t skimp on the eggs, but also ensure enough milk or cream. A good rule of thumb is 2 large eggs per 1/2 cup of milk for a few slices. This balance creates a rich, creamy custard that fully penetrates the bread. Whisk thoroughly to combine egg yolks and whites fully for an even coating.
- Don’t Over-Soak (or Under-Soak!): This is where practice makes perfect. Submerge each slice for about 15-30 seconds per side, depending on the thickness and freshness of your bread. You want the bread to absorb the custard, but not become saturated and flimsy. Slightly stale bread is actually better here as it absorbs more evenly without disintegrating.
- Heat Control is Key: Cook your French toast over medium heat. If the pan is too hot, the outside will burn before the inside cooks through. Too low, and it will dry out and become tough. A steady, moderate heat ensures golden-brown exteriors and perfectly cooked, custardy interiors.
- Use a Non-Stick Pan or Griddle: A well-seasoned cast iron skillet or a good quality non-stick pan will prevent sticking and help achieve that beautiful golden crust. Make sure to lightly butter or oil the pan before each batch to ensure even browning.
- Add Flavor to the Custard: Beyond vanilla extract, consider a pinch of cinnamon, nutmeg, or even a dash of almond extract for an extra layer of flavor. A tablespoon of orange zest can also brighten the profile beautifully.
- Cook in Batches: Don’t overcrowd the pan! Cook 2-3 slices at a time to maintain even heat and allow each piece to cook properly. Overcrowding drops the pan temperature and leads to uneven browning.
- Keep Warm: As you finish batches, transfer cooked French toast to a baking sheet in a preheated oven at its lowest setting (around 200°F / 95°C) to keep them warm and slightly crisp while you finish the rest. This ensures everyone gets to enjoy warm French toast.
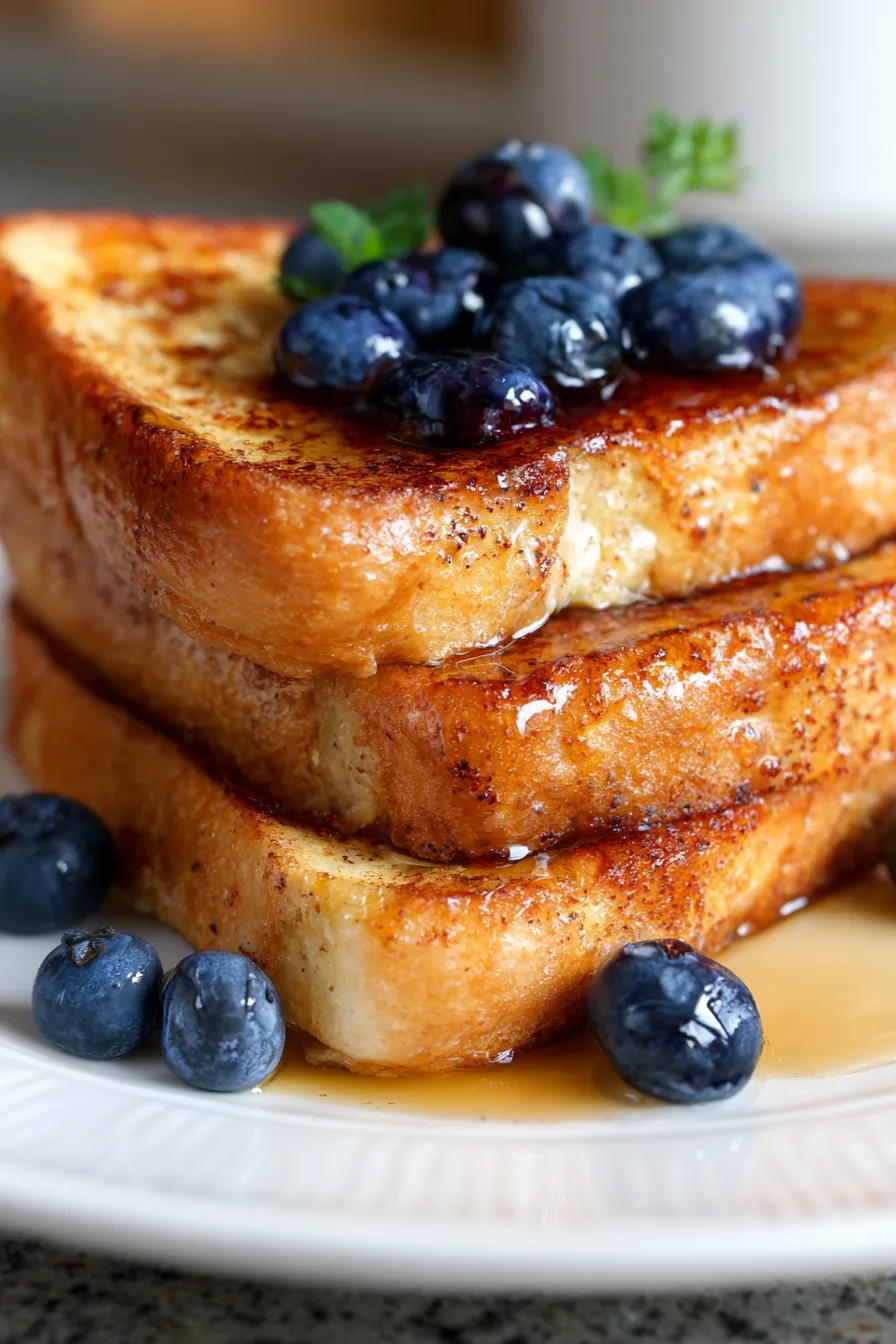
- Toppings Galore: While maple syrup is a classic, don’t be afraid to get creative! Fresh berries, sliced bananas, whipped cream, a sprinkle of powdered sugar, chocolate sauce, toasted nuts, or even a dollop of fruit compote can transform your French toast experience.
Variations & Substitutions
- Gluten-Free French Toast: Easily make this recipe gluten-free by using your favorite gluten-free bread. Look for sturdier, thicker-sliced GF breads that can hold up to soaking. The cooking method remains the same!
- Dairy-Free Option: Simply swap out regular milk for a plant-based alternative like almond milk, soy milk, oat milk, or coconut milk (for a hint of tropical flavor!). Ensure your plant milk is unsweetened to control the sugar content.
- Vegan French Toast: This requires a bit more modification but is totally doable! Instead of eggs, you can use a flax egg (1 tbsp ground flaxseed + 3 tbsp water, let sit for 5 minutes) or a commercial egg replacer like Just Egg. For the dairy, use plant-based milk and plant-based butter for frying. There are also fantastic recipes for “chickpea flour French toast” where chickpea flour creates the “egg” mixture.
- Keto-Friendly French Toast: This variation requires specific low-carb bread. Look for keto-friendly bread brands, or even make your own almond flour or coconut flour bread. For the custard, use unsweetened almond milk and a sugar substitute like erythritol or stevia. Be mindful that keto breads often have a different texture and may absorb the custard differently, so adjust soaking time.
- Spiced French Toast: Elevate the flavor profile! Add a pinch of nutmeg, cardamom, or even a dash of pumpkin spice to your custard for a seasonal twist. A tiny bit of black pepper can also enhance sweetness!
- Citrus Zest Infusion: For a bright, fresh flavor, grate some orange or lemon zest into your custard mixture. The oils from the zest will infuse beautifully as the French toast cooks.
- Savory French Toast: Yes, really! Skip the sugar and cinnamon in the custard. Instead, add a pinch of garlic powder, onion powder, and a sprinkle of dried herbs like thyme or oregano. Top with avocado, a fried egg, or even some smoked salmon for a unique brunch experience.
- Stuffed French Toast: For an indulgent treat, spread cream cheese, Nutella, or fruit jam between two slices of bread, then dip and cook as usual. Secure with toothpicks if needed.
- Overnight French Toast Bake: Assemble the dipped bread in a baking dish the night before, cover, and refrigerate. Bake in the morning for an easy make-ahead option, perfect for feeding a crowd.
Storage & Freezing
Refrigerating Leftovers: Allow any leftover French toast to cool completely to room temperature. Store it in an airtight container or a Ziploc bag in the refrigerator for up to 3-4 days. For best results, place parchment paper between layers to prevent sticking.
Reheating:
- Toaster Oven/Toaster: This is my preferred method for getting crisp edges back. Toast slices on a medium setting until heated through and slightly crispy.
- Microwave: For quick reheating, microwave slices for 30-60 seconds, or until warm. Be aware that this method might make them a little softer, not as crispy.
- Oven: Preheat your oven to 350°F (175°C). Place French toast on a baking sheet and heat for 8-10 minutes, or until warmed through. This keeps them from getting soggy.
- Skillet: Reheat in a lightly buttered pan over medium-low heat for a few minutes per side until warm and slightly re-crisped.
Freezing French Toast: French toast freezes beautifully! This is excellent for meal prepping.
- Cool Completely: Ensure the French toast is completely cooled after cooking.
- Flash Freeze: Place individual slices in a single layer on a baking sheet lined with parchment paper. Freeze for 1-2 hours until solid. This prevents them from sticking together.
- Store: Transfer the flash-frozen slices to a freezer-safe bag or airtight container. You can layer them with parchment paper in between. Label with the date. French toast can be stored in the freezer for up to 2-3 months.
- Reheating from Frozen: Reheat directly from frozen in a toaster oven, conventional oven (at 375°F/190°C for 10-15 minutes), or even a regular toaster on a higher setting. Avoid microwaving from frozen if you want to retain any crispness.
FAQ
For the best French toast, opt for thicker-sliced, sturdy breads that can absorb the custard without becoming soggy. Brioche, challah, sourdough, or even Texas toast are excellent choices. Day-old bread is often preferred as it absorbs the custard more effectively than super fresh bread.
Soggy French toast often happens for a few reasons. Firstly, the bread might be too fresh or too thin, causing it to over-absorb the custard and fall apart. Secondly, you might be over-soaking the bread in the custard mixture. Aim for 15-30 seconds per side. Lastly, ensure your pan isn’t too hot, as it can cook the outside too quickly, leaving the inside uncooked and wet. Cook over medium heat for even cooking.
While the actual dipping and cooking are best done just before serving for optimal freshness, you can certainly prep elements ahead! You can whisk together your custard mixture and store it in an airtight container in the refrigerator for up to 2 days. Cooked French toast can be refrigerated for 3-4 days or frozen for up to 2-3 months (see our detailed storage tips above!) and reheated easily.
The possibilities are endless! Classic toppings include pure maple syrup and a dusting of powdered sugar. Beyond that, consider fresh berries (strawberries, blueberries, raspberries), sliced bananas, whipped cream, chocolate syrup, fruit compotes (like apple or berry), toasted nuts, or even a drizzle of caramel sauce. Get creative and enjoy!
There you have it – the ultimate guide to creating perfect, fluffy, and golden Simple French Toast every single time. This recipe is more than just breakfast; it’s an invitation to slow down, savor, and make delicious memories. Whether it’s a quiet morning or a bustling family brunch, these golden slices are sure to bring smiles. Don’t forget to pin this recipe for later and share your creations with us!
Simple French Toast: The Best Easy Recipe for Cozy Brunch
Ingredients
- 8 slices thick bread (brioche, challah, or sourdough recommended)
- 2 large eggs
- 1/2 cup whole milk (or half-and-half for richer)
- 1 tablespoon granulated sugar
- 1 teaspoon vanilla extract
- 1/2 teaspoon ground cinnamon
- Pinch of salt
- 2 tablespoons unsalted butter (for frying)
- Maple syrup, powdered sugar, fresh berries (for serving)
Instructions
- Step 1 In a shallow dish, whisk together eggs, milk, sugar, vanilla, cinnamon, and salt until well combined.
- Step 2 Melt 1 tablespoon of butter in a large skillet or griddle over medium heat.
- Step 3 Dip each slice of bread into the egg mixture for 15-30 seconds per side, allowing it to soak but not become soggy.
- Step 4 Place dipped bread onto the hot skillet. Cook for 2-4 minutes per side, or until golden brown and cooked through.
- Step 5 Repeat with remaining bread, adding more butter as needed.
- Step 6 Serve immediately with your favorite toppings like maple syrup, powdered sugar, and fresh berries.