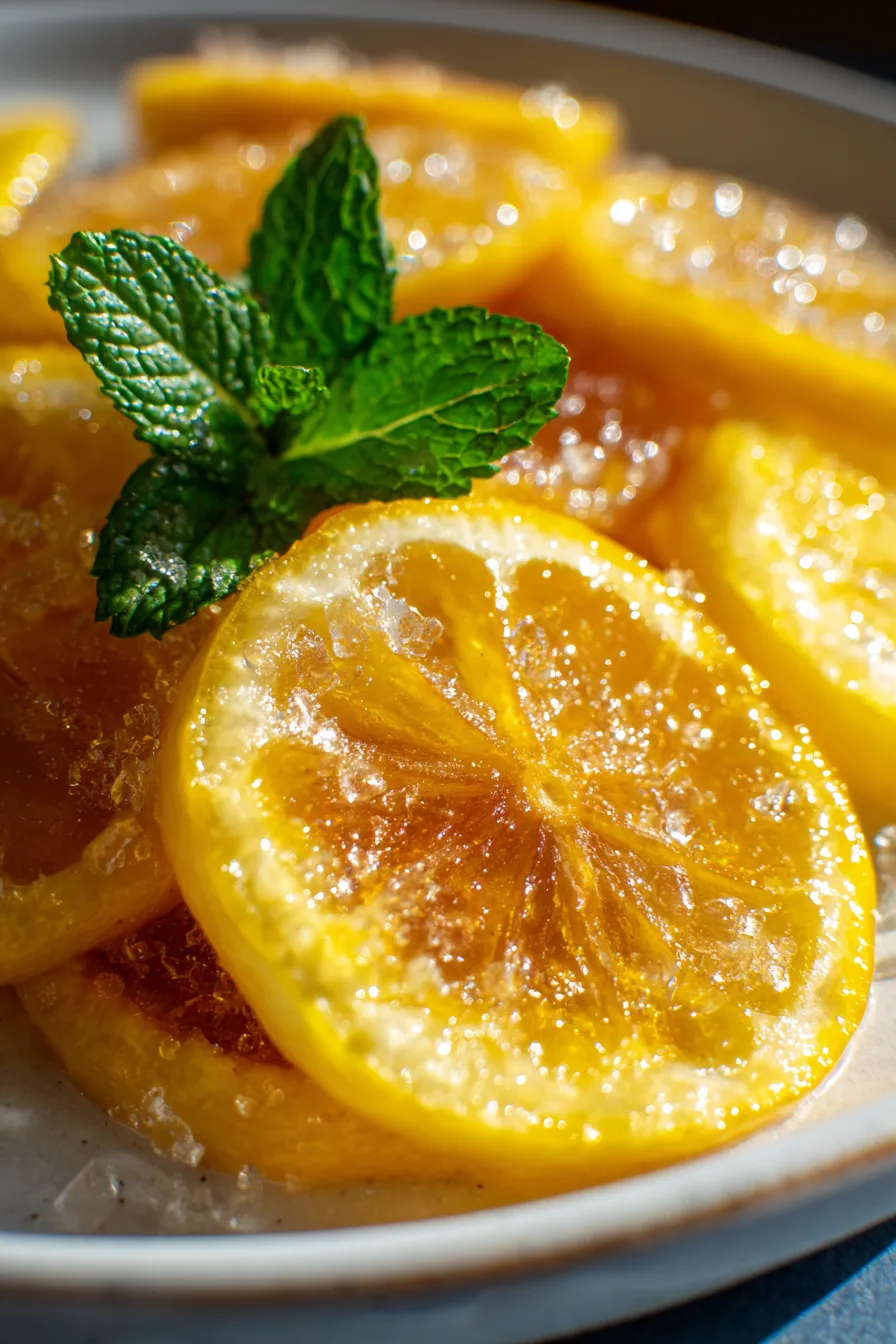
Sweet & Zesty Homemade Candied Lemon Slices: Your New Favorite Treat!
There’s something truly magical about turning simple ingredients into a gourmet delight. I still remember the first time I made candied lemon slices. It was a crisp autumn afternoon, and I had a surplus of beautiful, bright lemons from a local market run. My grandmother always said, “Never let a good lemon go to waste!” So, I decided to embark on a little kitchen adventure. The aroma that filled my home – a perfect blend of bright citrus and sweet sugar – was utterly intoxicating.
That day, what started as an experiment quickly became a family favorite. These glistening, sweet-tart slices are not just a wonderful easy dessert topping; they’re a versatile gourmet treat that adds a touch of elegance to anything from cakes to cocktails. This tested recipe is a delightful way to preserve the sunshine of lemons, making them irresistible any time of year.
Ready to bring some zest and sparkle into your kitchen? Let’s make these incredible candied lemon slices!

Why You’ll Love This Recipe
❤️ You’re about to discover why these candied lemon slices will become a staple in your kitchen!
- Incredibly Versatile: These aren’t just for eating plain! Use them to garnish cakes, cupcakes, tarts, and pies. Drop them into iced tea, cocktails, or even a glass of sparkling water for a gourmet touch. They also make a stunning topping for cheesecakes or a decorative addition to a charcuterie board.
- Surprisingly Simple: Don’t let their elegant appearance fool you. The process is straightforward, requiring just a few basic ingredients and a bit of patience. It’s a fantastic project for beginners and seasoned cooks alike, offering a rewarding culinary experience with minimal stress.
- Bursting with Flavor: Each slice delivers an intense balance of sweet and tart. The cooking process mellows the lemon’s bitterness, transforming it into a delightful, chewy candy with a vibrant citrus punch that tantalizes the taste buds.
- Beautifully Decorative: With their translucent, glistening appearance, candied lemon slices are naturally stunning. They add a sophisticated pop of color and texture to any dish or dessert, making everything look professionally crafted and utterly inviting.
- Economical & Zero Waste: Make the most of your lemons! This recipe is perfect for using up extra citrus and even allows you to repurpose the flavorful syrup left over from candying. No part of the lemon goes to waste, making it an eco-friendly choice.
- Wonderful Homemade Gift: Packaged beautifully, candied lemons make thoughtful, personalized gifts for friends, family, or hosts. They’re unique, delicious, and show you’ve put extra love into your present.
- Long Shelf Life: Properly stored, these sweet treats last for weeks, allowing you to enjoy their bright flavor long after you’ve made them. This means you can make a big batch and have them on hand whenever a craving or garnishing need strikes.
What You Need
You only need a few simple pantry staples for this recipe! Check the full printable recipe card below for detailed measurements.

Expert Tips
💡 Master the art of candied lemons with these insider tips!
- Choose Your Lemons Wisely: Opt for organic, unwaxed lemons if possible. If you can’t find unwaxed, scrub them thoroughly under hot water with a brush to remove any wax coating. Look for firm, bright yellow lemons with smooth skins. Meyer lemons also work beautifully for a slightly sweeter, less acidic result.
- Slice Evenly and Thinly: Uniform slices are key for even candying. Use a sharp knife or a mandoline slicer to get consistent 1/8 to 1/4-inch thickness. Thinner slices will become more translucent and delicate, while thicker ones will have more chew.
- Blanching is Non-Negotiable: Don’t skip the blanching step! This crucial process helps remove bitterness from the lemon rinds and softens them, allowing the sugar syrup to penetrate more effectively. Repeat the blanching 2-3 times for a truly mellow flavor.
- Gentle Simmering is Key: Maintain a very gentle simmer throughout the candying process. Rapid boiling can cause the lemons to break apart or become tough. The goal is a slow, gradual infusion of sugar into the lemon cells.
- Don’t Overcrowd the Pot: Give your lemon slices space in the pot. If they’re too crowded, they won’t cook evenly, and the syrup might not circulate properly. Work in batches if necessary.
- Preserve the Syrup: The leftover lemon-infused syrup is liquid gold! Store it in an airtight container in the fridge for up to a month. Use it in cocktails, lemonade, drizzle over pancakes, or even in salad dressings for a sweet-tart kick.
- Cool on a Rack: After simmering, transfer the slices to a wire rack set over parchment paper. This allows air to circulate around them, preventing sticking and promoting even drying. If you skip this, they might stick to the paper.
- Dust with Sugar (Optional but Recommended): Once slightly tacky but still warm, you can toss the candied slices in granulated sugar for a sparkling, non-sticky finish. This also adds another layer of delightful crunch and sweetness.
- Patience is a Virtue: Allow ample drying time. Depending on humidity, this could take anywhere from 12-24 hours. The goal is for them to be firm, pliable, and no longer sticky to the touch. Rushing this step will result in sticky, less shelf-stable candied lemons.
Variations & Substitutions
- Other Citrus: Feel free to experiment with other citrus fruits like oranges, grapefruits, or limes for different flavor profiles. Adjust blanching times as needed; thicker skins might require more.
- Spiced Syrup: Infuse your sugar syrup with warming spices like a cinnamon stick, a few cloves, star anise, or a vanilla bean for an extra layer of flavor.
- Herbal Twist: Add a sprig of rosemary or thyme to the simmering syrup for a fragrant, savory-sweet note that pairs beautifully with the lemon.
- Chocolate Dipped: For an indulgent treat, once fully dried, dip half of each candied lemon slice into melted dark chocolate. Let set on parchment paper until hardened.
- Sugar Alternatives: While granulated sugar is traditional, you can try substituting with coconut sugar or a blend of erythritol and stevia for a lower-carb option, though the texture and shine might vary slightly.
Storage & Freezing
- Storing: Once completely dry, store candied lemon slices in an airtight container at room temperature for up to 2-3 weeks, or in the refrigerator for up to a month. Layer them between sheets of parchment paper to prevent sticking.
- Freezing: Candied lemons can be frozen for longer storage. Arrange them in a single layer on a parchment-lined baking sheet and freeze until firm. Then transfer to a freezer-safe bag or container, separating layers with parchment paper. They will keep for up to 3 months. Thaw at room temperature before using.
FAQ
Why are my candied lemons sticky?
They might be sticky if they haven’t been dried long enough. Ensure they are completely dry and firm to the touch before storing. High humidity can also affect drying time; consider using a very low oven (around 150°F / 65°C) with the door ajar for an hour or two to help them along if needed.
Can I use less sugar?
The sugar is crucial for both preserving the lemons and creating the candied texture. Reducing it significantly might result in less preserved slices that are more prone to spoilage and a less desirable chewy texture. The sugar syrup infusion is what makes them “candied”!
What can I do with the leftover lemon syrup?
The leftover syrup is delicious! Use it as a sweetener for tea, cocktails, or lemonade. Drizzle it over pancakes, waffles, or ice cream. It also makes a fantastic addition to glazes for cakes or muffins, adding a bright, sweet lemon flavor.
There you have it – your guide to creating truly dazzling candied lemon slices! Whether you’re making them for a special occasion or just to treat yourself, these sweet and zesty gems are sure to bring a smile. Don’t forget to Pin this recipe for later and share your beautiful creations with me! Happy candying!

Sweet & Zesty Candied Lemon Slices: Your New Favorite Treat!
Ingredients
- 4-5 medium lemons (organic, unwaxed preferred)
- 2 cups granulated sugar (plus extra for dusting)
- 2 cups water
- Pinch of salt (optional, to enhance flavor)
Instructions
- Step 1 Wash lemons thoroughly. Slice them into 1/8 to 1/4-inch thick rounds, removing any seeds.
- Step 2 Place lemon slices in a medium saucepan and cover with cold water. Bring to a boil, then immediately drain and rinse with cold water. Repeat this blanching process 2 more times to reduce bitterness.
- Step 3 In the same saucepan, combine 2 cups granulated sugar and 2 cups water. Bring to a simmer over medium heat, stirring until sugar is fully dissolved.
- Step 4 Add the blanched lemon slices to the simmering syrup in a single layer. Reduce heat to low and simmer gently for 45-60 minutes, or until the rinds are translucent and tender. The syrup should barely bubble.
- Step 5 Carefully remove the lemon slices from the syrup using tongs and place them on a wire rack set over a sheet of parchment paper or aluminum foil. Reserve the syrup for later use.
- Step 6 Allow the candied lemon slices to dry at room temperature for 12-24 hours, or until they are no longer sticky and are pliable but firm.
- Step 7 For an extra sparkle and to prevent sticking, you can gently toss the slightly tacky (but not wet) slices in a bowl with extra granulated sugar.
- Step 8 Store in an airtight container at room temperature for up to 2-3 weeks, or refrigerate for longer.