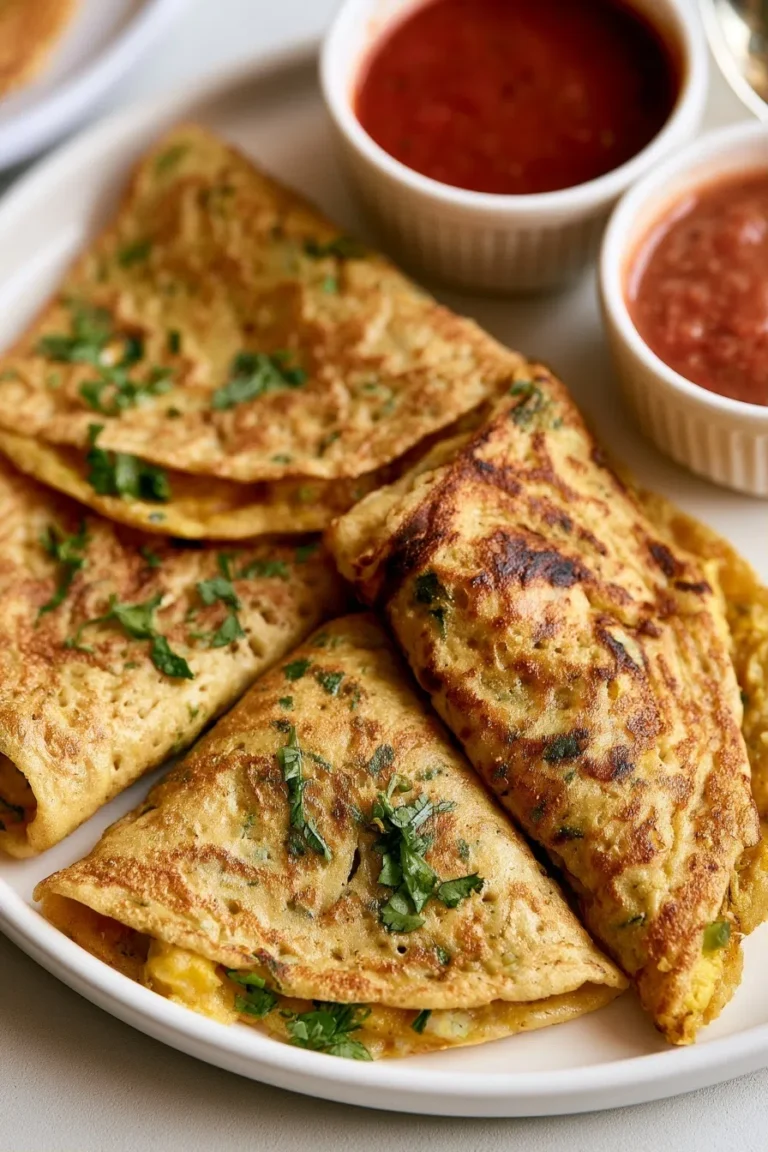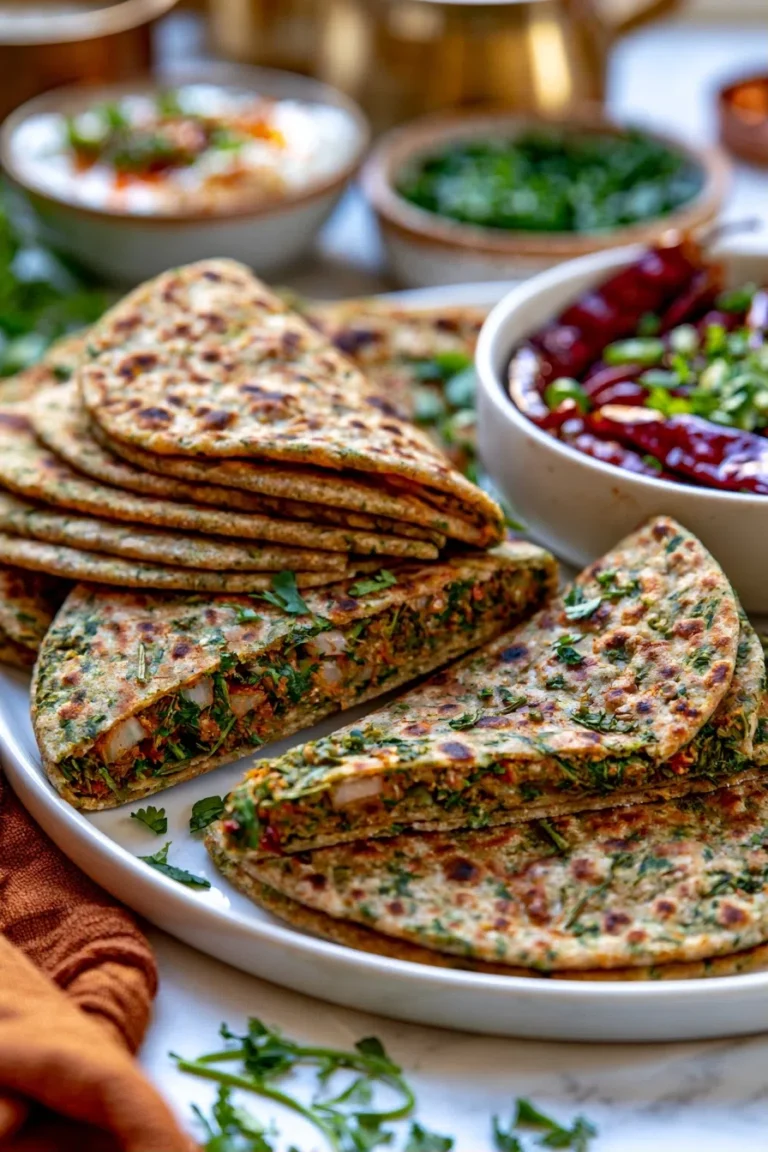
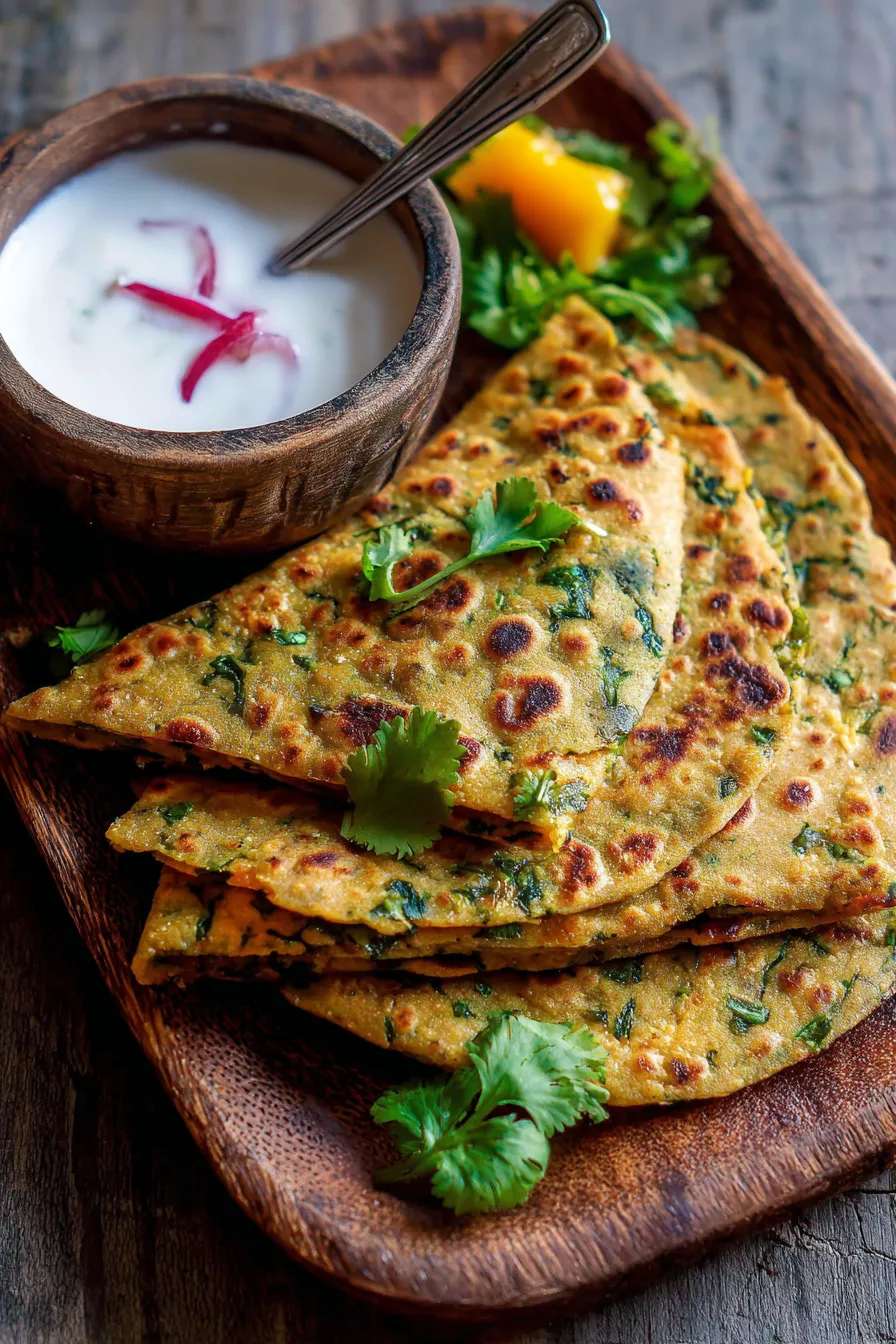
Vibrant Spring Methi Thepla: Your New Favorite Healthy Indian Breakfast
There’s something truly magical about spring mornings. The air feels crisp, the birds are singing, and the world awakens with a gentle promise of new beginnings. It reminds me of my grandmother, Nani, who always said that the best way to embrace a new day was with a healthy, hearty meal that brought joy to the soul. Her words echo in my kitchen every time I whip up a batch of these incredible **Spring Methi Thepla Indian Recipes | Healthy Breakfast**.
I remember one particularly misty spring morning when Nani first taught me to make them. The earthy scent of fresh fenugreek leaves mingled with the warming spices filled her tiny kitchen, creating an aroma that still takes me back. This isn’t just a recipe; it’s a nostalgic journey, a simple pleasure, and a beautiful way to bring nutritious spring flavors into your day. This tested family recipe has become my go-to for an easy Indian breakfast, a healthy snack, or even a light dinner.
These thin, flavorful flatbreads, infused with the goodness of fresh fenugreek, are not only incredibly delicious but also surprisingly simple to make. They are perfect for meal prep, ideal for busy mornings, and an absolute delight to share. Get ready to fall in love with your new favorite healthy breakfast!
Why You’ll Love This Recipe
❤️ Here’s why these Spring Methi Thepla will quickly become a cherished favorite in your home:
- Nutritional Powerhouse: Fresh methi (fenugreek) leaves are packed with vitamins, minerals, and dietary fiber, promoting good digestion and overall well-being. It’s a fantastic way to sneak in some healthy greens!
- Incredible Flavor Profile: The distinct, slightly bitter and earthy taste of methi is beautifully balanced by warming spices like turmeric, red chili powder, and carom seeds. Each bite is a burst of authentic Indian flavor that is both comforting and invigorating.
- Light & Satisfying: Made primarily with whole wheat flour, these theplas are wholesome and keep you feeling full and energized without being heavy. They’re a perfect healthy breakfast choice or a light meal.
- Amazingly Versatile: Enjoy them for breakfast, pack them in lunchboxes, serve them as a travel-friendly snack, or even pair them with a simple curry for dinner. They’re delicious hot or at room temperature.
- Quick & Easy to Prepare: With minimal active cooking time, this recipe is perfect for busy weeknights or lazy weekend mornings. The dough comes together quickly, and rolling and cooking are surprisingly meditative.
- Family-Friendly Goodness: Even picky eaters often enjoy the mild, savory taste of thepla. You can adjust the spice levels to suit everyone’s palate, making it a crowd-pleaser for all ages.
- Naturally Vegetarian: This recipe is entirely vegetarian and can be easily adapted to be vegan (by substituting yogurt) or gluten-free (with appropriate flour blends), catering to various dietary needs.
- A Taste of Tradition: Thepla holds a special place in Gujarati cuisine, known for its travel-friendly nature and comforting flavors. Making it at home connects you to centuries of culinary heritage.
- Spring Freshness: Utilizing fresh spring methi ensures the best possible flavor and aroma, making this dish vibrant and seasonally appropriate. It’s a celebration of fresh produce!
- Perfect for Meal Prep: Theplas store well and can be made in advance, making your mornings even smoother. Simply reheat them gently, and they’re ready to enjoy.
What You Need
You only need a few simple pantry staples for this recipe, combined with fresh methi leaves, to create these incredibly flavorful flatbreads! Check the full printable recipe card below for detailed measurements and a complete list of ingredients.
Expert Tips
💡 Achieving perfect, soft, and flavorful theplas is easy with these insider tips:
- Selecting Fresh Methi: Always choose vibrant, green fenugreek leaves without any yellowing or wilting. Freshness truly makes a difference in flavor. Wash them thoroughly and pat them completely dry before chopping to avoid excess moisture in the dough.
- Fine Chopping is Key: Ensure your methi leaves are very finely chopped. Larger pieces can tear the dough during rolling and make the theplas uneven.
- Dough Consistency Matters: The dough should be soft, pliable, and smooth, but not sticky. It should feel like a soft chapati dough. If it’s too stiff, your theplas will be hard; if too soft, they’ll be difficult to roll. Adjust water (or flour) sparingly.
- Knead Well & Rest: Knead the dough for at least 5-7 minutes until it’s smooth and elastic. Then, cover it with a damp cloth and let it rest for 15-20 minutes. This allows the gluten to relax, making the dough easier to roll and the theplas softer.
- The Flour Blend: The addition of besan (gram flour) is crucial. It adds a lovely nutty flavor, helps bind the dough, and contributes to the soft texture. Don’t skip it!
- Spices: Toasting for Aroma: If you’re using whole spices like carom seeds, lightly dry roast them for a few seconds before crushing or adding to the dough. This brings out their essential oils and deepens the flavor profile. Adjust chili powder to your heat preference.
- Rolling Technique: Use minimal dry flour for dusting while rolling to prevent the theplas from becoming tough. Roll them evenly and as thinly as possible (about 6-7 inches in diameter) for the best texture. Aim for uniform thickness to ensure even cooking.
- Heat Control on the Tawa: Cook the theplas on a medium-high heated tawa (griddle). If the tawa is too cold, the thepla will dry out. If it’s too hot, it will burn on the outside before cooking through.
- Using Oil for Cooking: Apply a little oil (or ghee) on both sides while cooking. This helps create those lovely golden-brown spots and prevents the thepla from sticking, giving it a slightly crisp edge while keeping the inside soft.
- Gentle Pressing: While cooking, gently press the thepla with a spatula, especially around the edges. This helps it cook evenly and encourages it to puff up beautifully, indicating it’s well-cooked.
- Don’t Overcook: Cook each side for about 1-2 minutes until golden-brown spots appear. Overcooking will make the theplas dry and hard. They should remain soft and flexible.
- Keep Them Warm: As you cook the theplas, stack them in a clean kitchen towel inside a casserole dish. This keeps them warm and soft until serving time.
Variations & Substitutions
One of the best things about Methi Thepla is how adaptable it is! Feel free to get creative with these delicious twists:
- Other Greens: Don’t have methi? Or want to add more greens? You can substitute or add finely chopped spinach (palak), cilantro (dhaniya), or even finely grated zucchini for extra nutrition.
- Spice It Up: For an extra kick, add a pinch of garam masala, finely chopped green chilies, or a dash of black pepper to the dough.
- Gluten-Free Option: While traditional thepla uses wheat flour, you can experiment with a gluten-free flour blend. You might need to adjust the water content and dough consistency, and add a binder like xanthan gum.
- Vegan Friendly: This recipe is almost vegan! Simply swap out the regular yogurt for a plant-based yogurt (like almond or soy yogurt) or even warm water with a tablespoon of lemon juice, and use oil instead of ghee for cooking.
- Add Vegetables: Finely grated carrots, bottle gourd (lauki), or even mashed potatoes can be incorporated into the dough for added flavor and nutrients.
- Protein Boost: Mix in a couple of tablespoons of finely grated paneer (Indian cottage cheese) or crumbled tofu for a protein-rich twist.
- Different Flours: For a more rustic touch, try adding a small amount of jowar (sorghum) flour or bajra (pearl millet) flour to the whole wheat and besan blend.
Storage & Freezing
These Spring Methi Theplas are excellent for meal prep and store beautifully, ensuring you have a healthy snack or breakfast ready anytime.
- Refrigerator: Once cooled completely, stack the theplas with parchment paper in between (to prevent sticking) and store them in an airtight container in the refrigerator for up to 3-4 days.
- Freezer: For longer storage, allow the cooked theplas to cool completely. Stack them with parchment paper in between and place them in a freezer-safe bag or container. They can be frozen for up to 2-3 months.
- Reheating: Thaw frozen theplas in the refrigerator overnight or at room temperature. Reheat them gently on a hot tawa with a little oil or ghee until warmed through and soft again. You can also microwave them for 30-60 seconds, but a tawa yields the best texture.
FAQ
Q: What exactly is Methi?
A: Methi refers to fenugreek leaves, a popular herb in Indian cuisine. It has a distinct earthy, slightly bitter flavor and is known for its numerous health benefits, including aiding digestion and managing blood sugar levels.
Q: Can I use dried or frozen methi instead of fresh?
A: While fresh methi is highly recommended for the best flavor and texture, you can use dried Kasoori Methi (fenugreek leaves) or frozen methi. If using dried, soak a tablespoon in warm water for 10 minutes before adding to the dough. If using frozen, thaw it completely and squeeze out all excess water before incorporating.
Q: Why are my theplas hard and not soft?
A: Theplas can become hard if the dough is too stiff, not kneaded enough, or if they are overcooked. Ensure your dough is soft and pliable, knead it well, and cook them just until golden spots appear on both sides, without drying them out.
Q: What should I serve with Spring Methi Thepla?
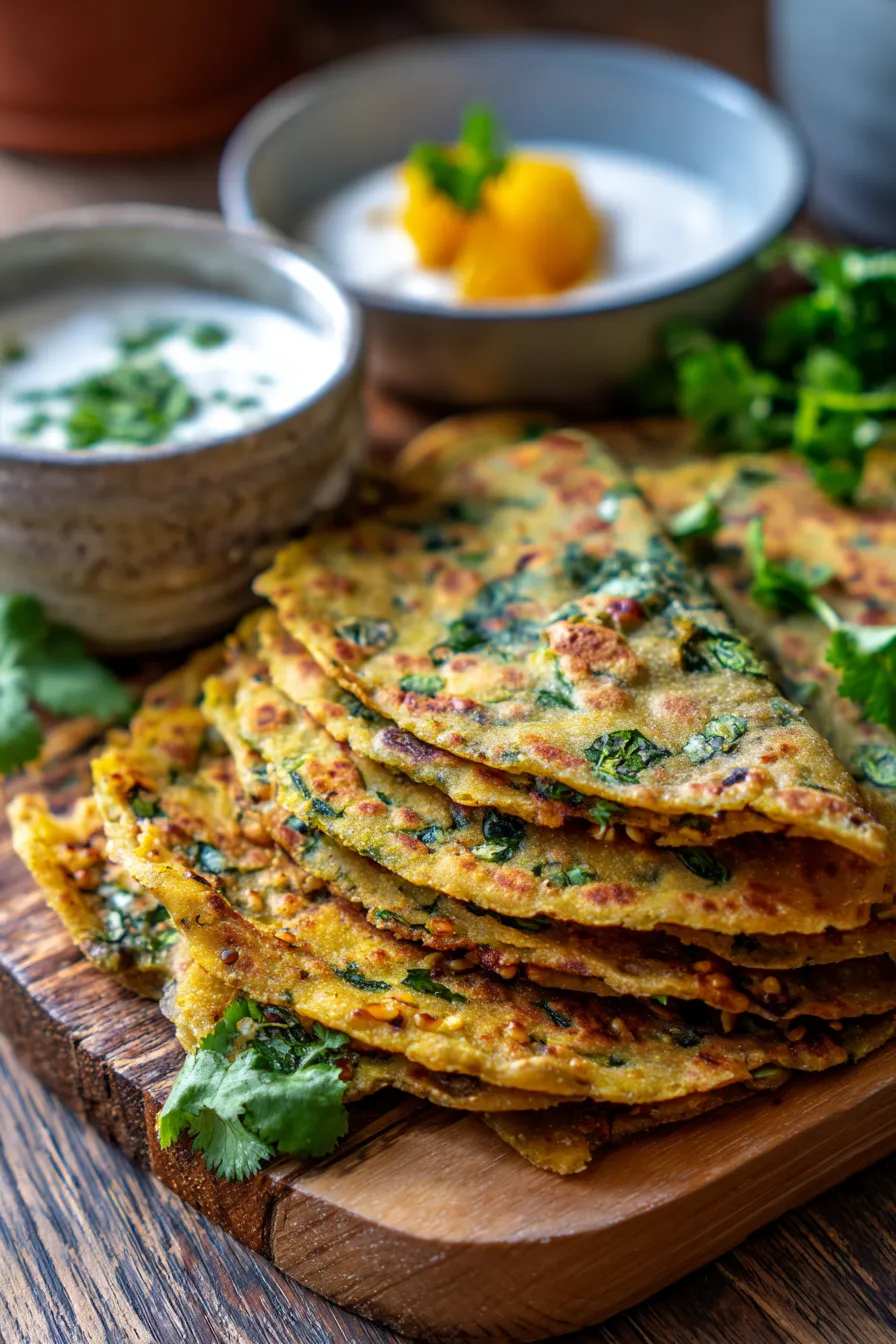
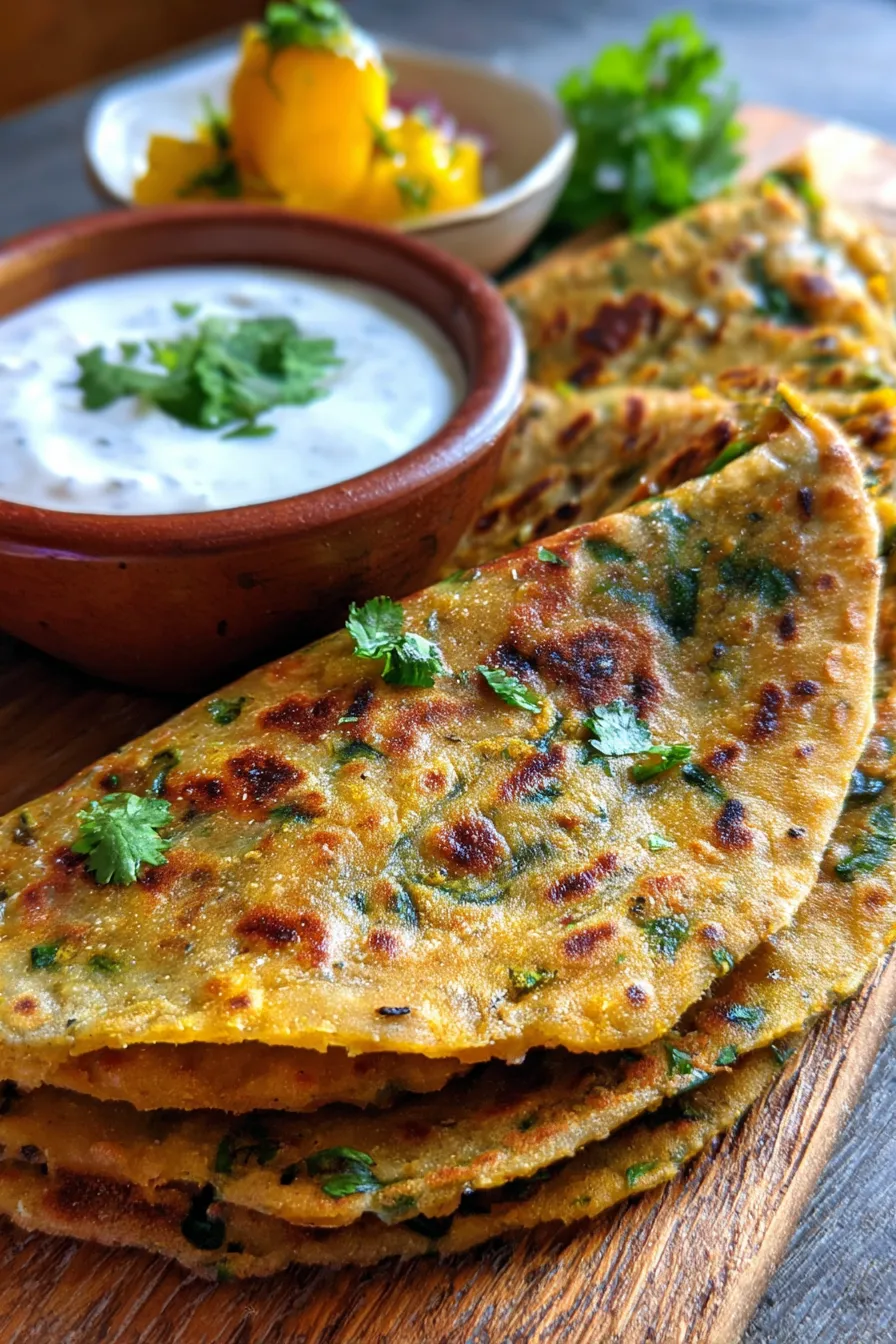
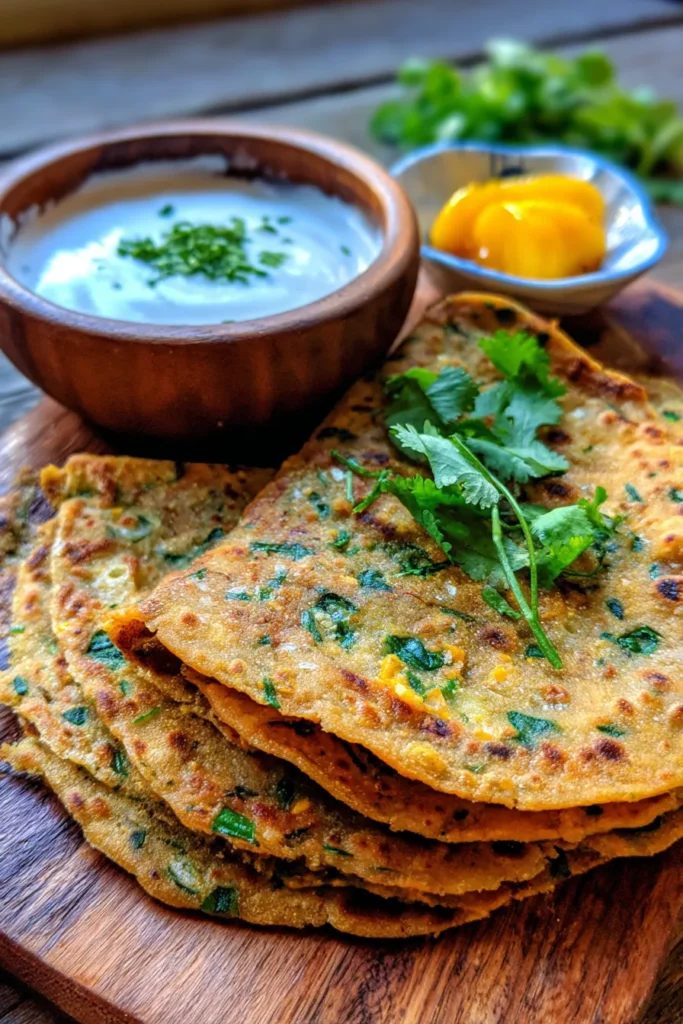
A: Theplas are wonderfully versatile! They are traditionally served with plain yogurt (dahi), mango pickle (aam ka achaar), or a fresh green chutney. They also pair well with a hot cup of chai, or simply enjoyed on their own as a healthy snack.
Q: Can I make the dough ahead of time?
A: Yes, absolutely! You can prepare the dough and store it in an airtight container in the refrigerator for up to 24 hours. Just let it come to room temperature for about 15-20 minutes before rolling and cooking.
Conclusion
Embrace the vibrant flavors of spring with these incredibly delicious and healthy Spring Methi Thepla. This recipe isn’t just about making food; it’s about creating memories, sharing warmth, and nourishing your body with goodness. They’re perfect for any meal, any time of day, and guaranteed to bring a smile to your face.
Give this family-favorite recipe a try and let me know how much you loved it! Don’t forget to Pin this for later so you can revisit this healthy and flavorful Indian breakfast whenever the craving strikes.
Vibrant Spring Methi Thepla: Your New Favorite Healthy Indian Breakfast
Ingredients
- 2 cups whole wheat flour (atta)
- 1/2 cup besan (gram flour)
- 1 cup finely chopped fresh methi leaves (fenugreek)
- 1 tsp ginger-garlic paste
- 1/2 tsp red chili powder (adjust to taste)
- 1/4 tsp turmeric powder
- 1/2 tsp carom seeds (ajwain)
- 1/4 tsp asafoetida (hing, optional)
- Salt to taste
- 2 tbsp plain yogurt (dairy or non-dairy)
- 2 tbsp oil (plus more for cooking theplas)
- Water as needed for kneading
Instructions
- Step 1 In a large mixing bowl, combine whole wheat flour, besan, finely chopped methi leaves, ginger-garlic paste, red chili powder, turmeric powder, carom seeds, asafoetida (if using), and salt. Mix well to ensure spices are evenly distributed.
- Step 2 Add yogurt and 2 tablespoons of oil to the flour mixture. Gently rub the ingredients together with your fingertips until the mixture resembles coarse crumbs.
- Step 3 Gradually add water, a little at a time, and knead into a soft, smooth, and pliable dough. Be careful not to add too much water. The dough should not be sticky. Knead for about 5-7 minutes until the dough is elastic.
- Step 4 Cover the dough with a damp cloth or plastic wrap and let it rest for at least 15-20 minutes. This allows the gluten to relax, making the dough easier to roll and the theplas softer.
- Step 5 Divide the rested dough into 12-15 equal small portions. Roll each portion into a smooth ball.
- Step 6 Lightly dust your rolling surface and a dough ball with a little dry flour. Using a rolling pin, roll each ball into a thin circle, about 6-7 inches in diameter. Aim for an even thickness.
- Step 7 Heat a tawa (flat griddle or non-stick pan) over medium-high heat. Once hot, place a rolled thepla on the tawa.
- Step 8 Cook for about 30-45 seconds until small bubbles appear on the surface. Flip the thepla.
- Step 9 Drizzle about 1/2 teaspoon of oil (or ghee) around the edges and on top of the thepla. Cook for another minute until golden-brown spots appear on the underside. Flip again.
- Step 10 Press gently with a spatula, especially around the edges, to ensure even cooking and encourage it to puff up slightly. Cook until both sides have golden-brown spots and it's cooked through. Remove from tawa.
- Step 11 Repeat the process with the remaining dough balls. Stack the cooked theplas in a clean kitchen towel inside a casserole dish to keep them warm and soft until serving.
- Step 12 Serve hot with plain yogurt, pickle, or chutney. Enjoy your healthy Spring Methi Thepla!