Vibrant Spring Beetroot Dosa: Your New Favorite Indian Breakfast Recipe!
My grandmother, a woman whose kitchen always smelled of spices and warmth, once told me, “Food is not just sustenance; it’s a hug from home.” I always carry that wisdom with me, especially when I craft recipes that bring joy and comfort, like these incredible Spring Beetroot Dosa Indian Recipes | Breakfast Recipes Indian. I remember the first time I experimented with beetroot in dosas. It was a crisp, bright spring morning, and I wanted to infuse our usual Sunday breakfast with a burst of color and nutrition. The result was an instant family favorite, a stunningly vibrant dish that brightened our table and our spirits.
These dosas are more than just a beautiful breakfast; they’re an ode to freshness and flavor, perfect for an easy breakfast or a light, healthy Indian recipe. This recipe has been tested countless times in my kitchen, perfected to ensure a truly authentic taste with a modern twist. You’re about to discover a new go-to comfort food that’s as delightful to make as it is to eat.
Why You’ll Love These Vibrant Spring Beetroot Dosas
❤️ Here’s why these Spring Beetroot Dosas will become your new obsession and a staple in your kitchen:
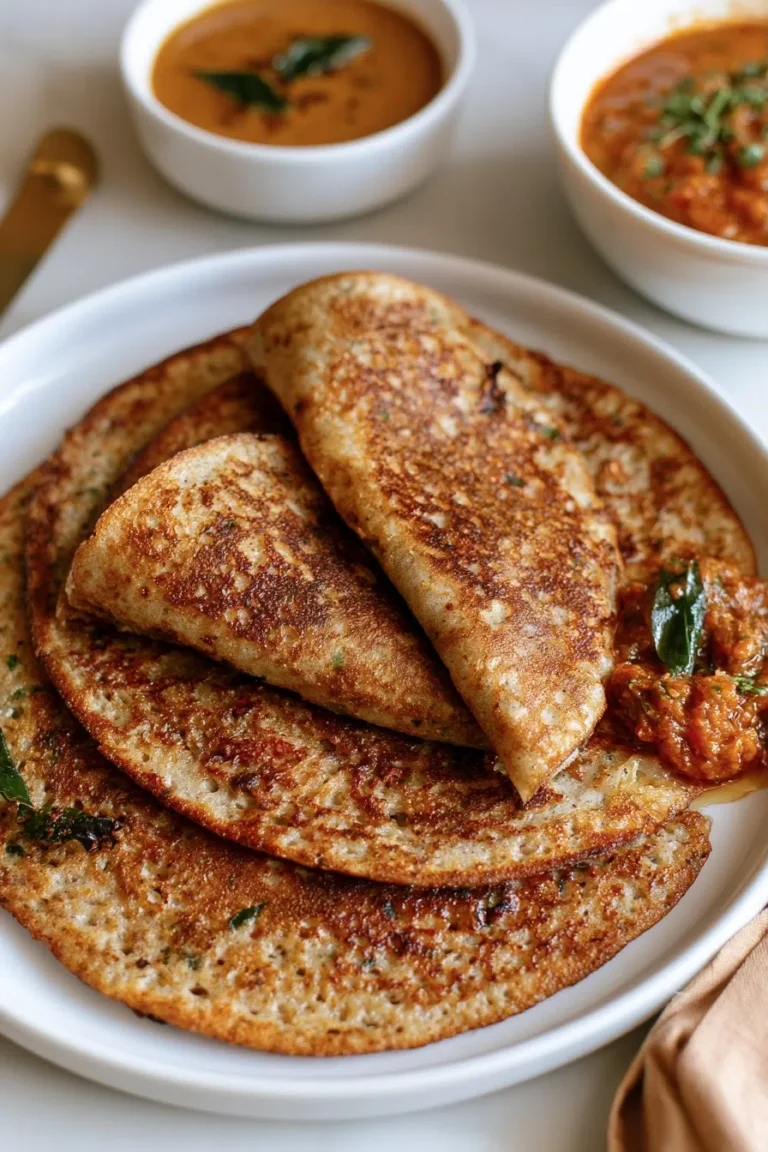
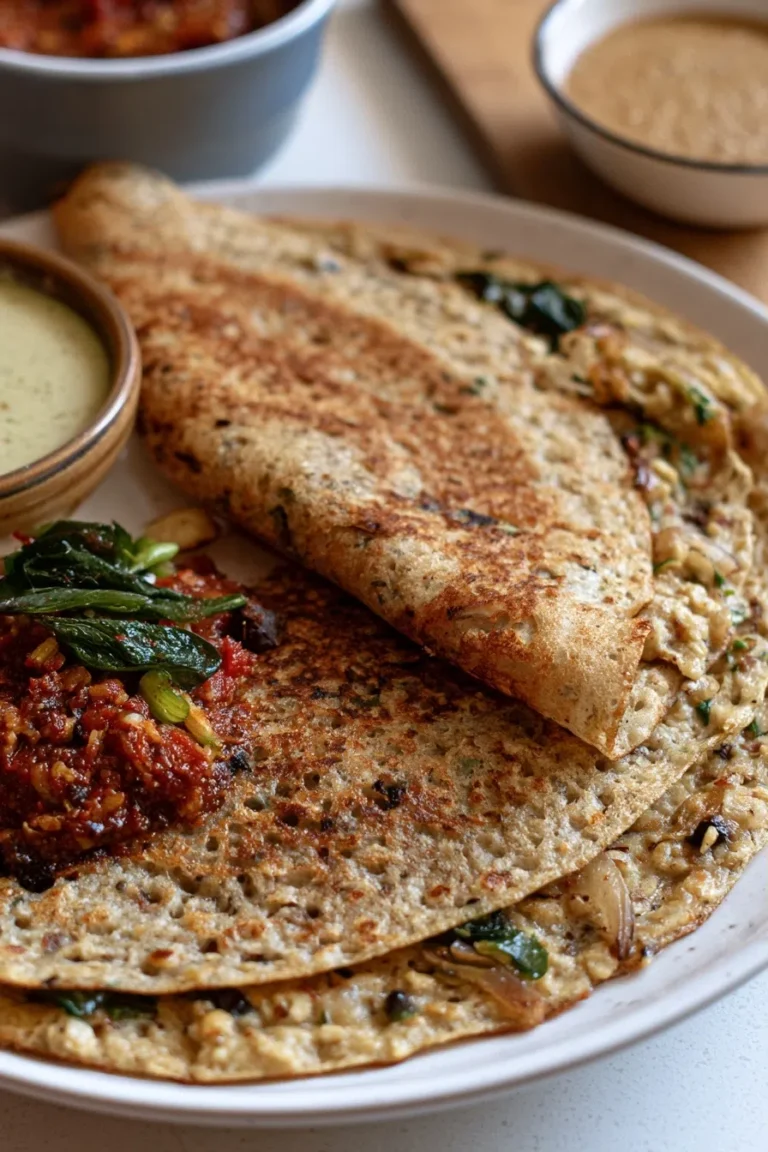
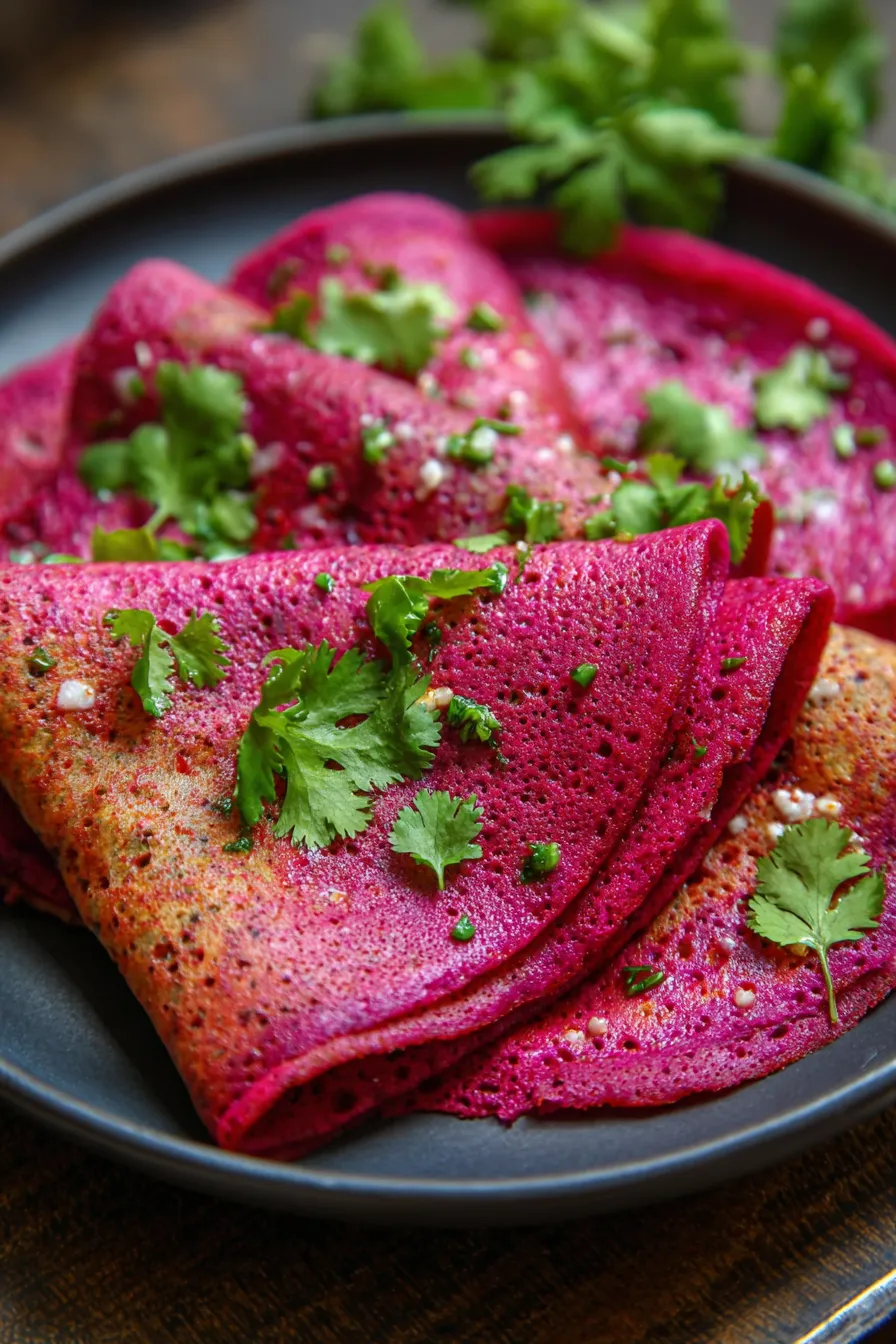
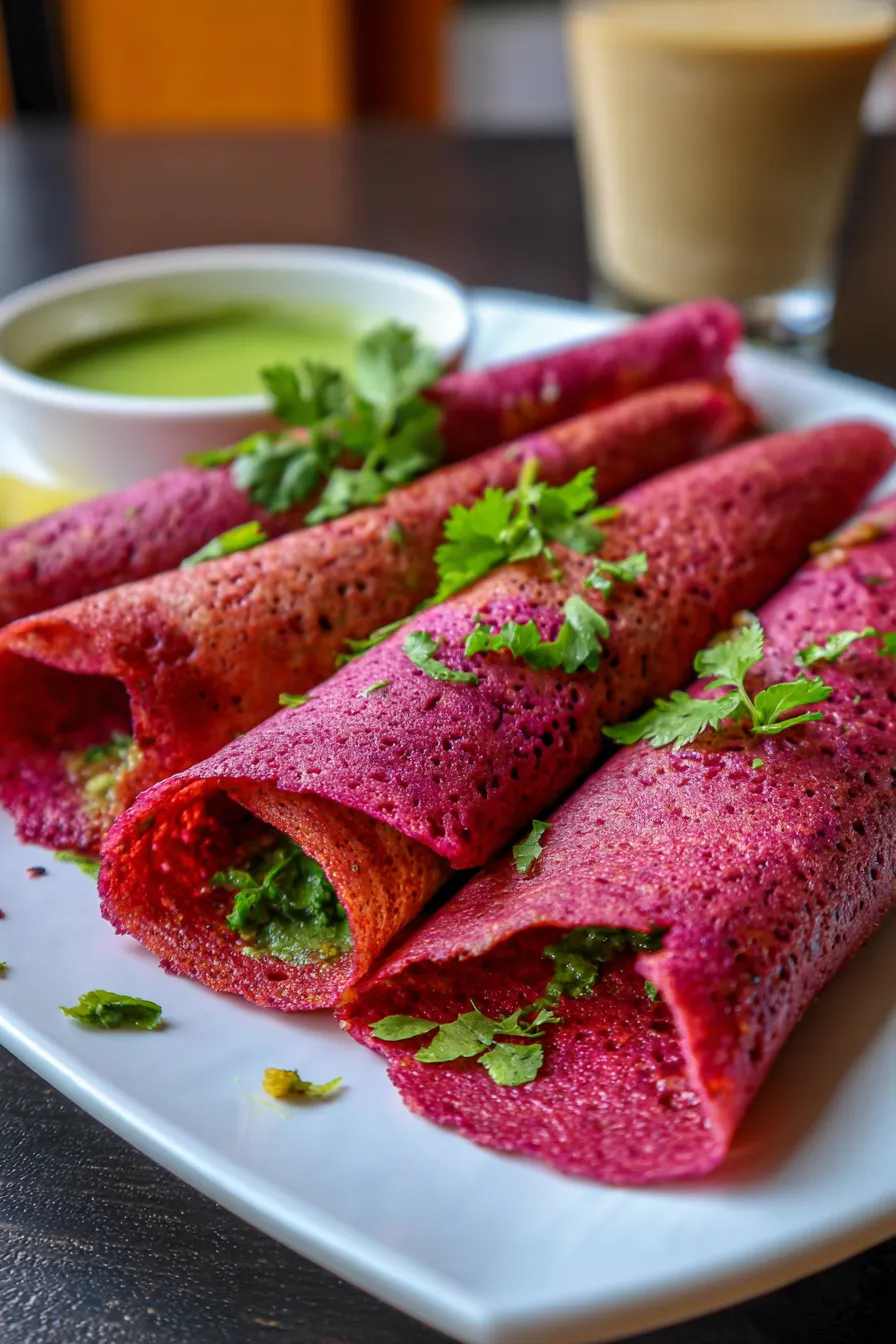
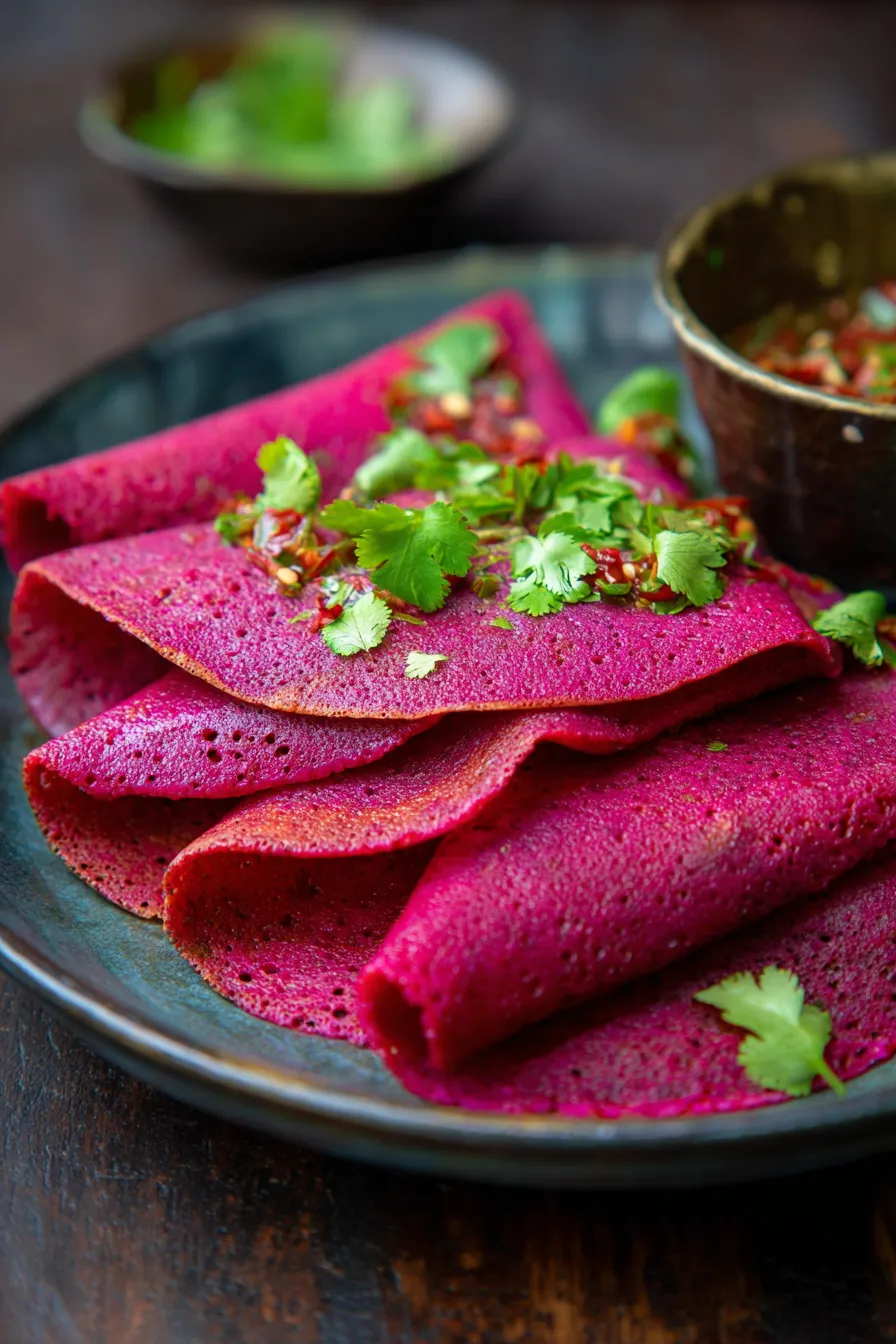
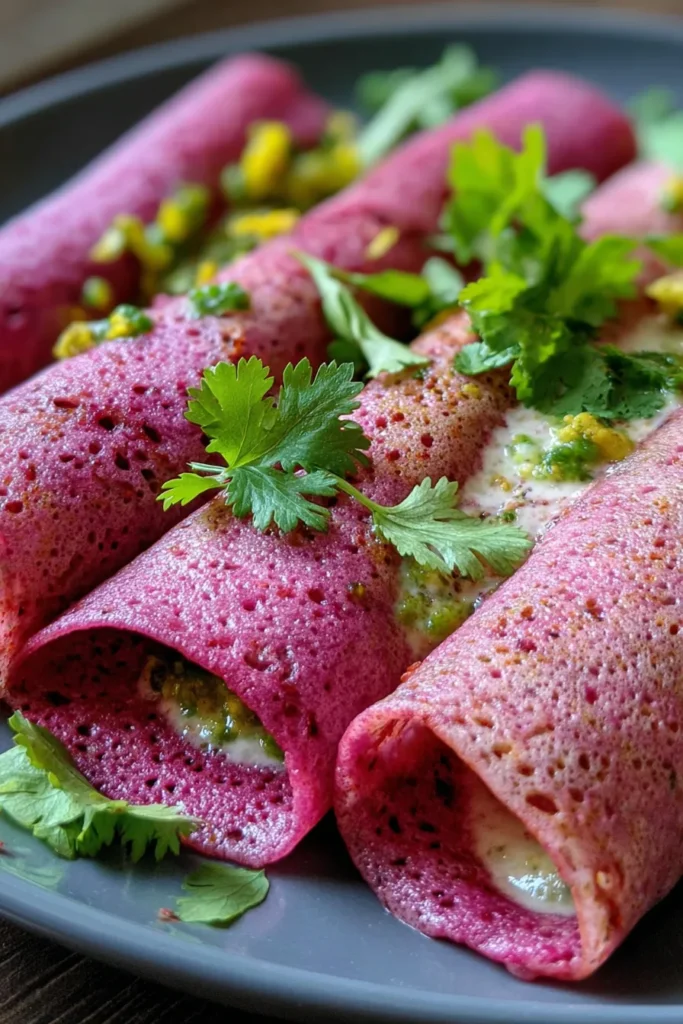
- A Feast for the Eyes: Prepare to be mesmerized by the stunning, jewel-toned crimson of these dosas! The natural pigment from fresh beetroots creates an incredibly vibrant, almost artistic presentation that’s guaranteed to impress. They transform your breakfast plate from ordinary to extraordinary, making every meal feel like a special occasion. Imagine serving these at a brunch — they’re sure to be the talk of the table!
- Nutritional Powerhouse Disguised as Deliciousness: Beyond their beauty, these dosas are incredibly good for you. Beetroots are loaded with essential vitamins like folate, minerals such as potassium and manganese, and powerful antioxidants. They are known for their anti-inflammatory properties and ability to support heart health. You’re essentially sneaking in a powerhouse of nutrients into a dish that tastes utterly indulgent. It’s a guilt-free way to enjoy your breakfast!
- Crispy Perfection, Every Single Time: The secret to a truly great dosa lies in its texture – a delicate, lace-like crispness on the outside and a soft, tender interior. This recipe has been fine-tuned to help you achieve that elusive perfect crispness with every pour. The unique addition of beetroot also lends a subtle moisture and earthiness that elevates the overall flavor profile, complementing the tangy, fermented batter beautifully.
- Naturally Accommodates Dietary Needs: This delightful recipe is a champion for those with specific dietary requirements. Crafted primarily from fermented rice and urad dal (black gram lentils), these dosas are naturally gluten-free. With the simple omission of any dairy-based side dishes (like ghee, easily substituted with oil), they are also entirely vegan-friendly. It’s a delicious way to cater to a variety of guests without needing multiple meal preparations.
- Surprisingly Simple for All Skill Levels: Don’t let the elegant appearance fool you – making these beetroot dosas is far more straightforward than you might think! While dosa-making can sometimes intimidate, my detailed instructions and expert tips break down each step, making it accessible and enjoyable for even novice cooks. You’ll gain confidence in your Indian cooking skills and be whipping up impressive dosas in no time.
- Unbelievably Versatile for Any Meal: While traditionally a breakfast staple, these Spring Beetroot Dosas are incredibly adaptable. Serve them for a light, healthy lunch alongside a refreshing coconut chutney, or transform them into a vibrant dinner by pairing them with a hearty sambar and a potato masala filling. They’re also fantastic for meal prep, as the batter can be stored, offering delicious flexibility throughout your week.
- A Canvas for Culinary Creativity: This recipe provides a fantastic base for experimentation. Feel free to adjust the spice level in the beetroot puree, add finely grated carrots or zucchini for extra veggies, or even incorporate different herbs into your batter. Want to make it spicier? Add more green chilies. Prefer a milder flavor? Reduce them. It’s a truly customizable dish that invites you to play and make it your own.
- Embrace the Freshness of Spring: The light, earthy flavor of beetroot combined with classic Indian spices perfectly captures the essence of spring. It’s a refreshing change from heavier winter meals, bringing a burst of color and seasonal delight to your plate. It feels fresh, invigorating, and wonderfully aligned with the rejuvenating spirit of the season.
What You Need for Spring Beetroot Dosa
You only need a few simple pantry staples for this recipe, alongside fresh, vibrant beetroot to achieve that stunning color! Check the full printable recipe card below for detailed measurements and a complete list.
Expert Tips for Dosa Perfection
💡 My Top Expert Tips for Dosa Perfection:
- The Fermentation is Key: Don’t rush the fermentation process! A properly fermented batter is what gives dosa its characteristic tangy flavor and airy, crispy texture. Depending on your climate, this can take anywhere from 8 to 18 hours. Look for a visibly risen batter with small bubbles on the surface, indicating active yeast. If your kitchen is cool, place the batter in a slightly warm oven (turned off, with the light on) or a warm spot to encourage fermentation. This crucial step develops both flavor and texture, making all the difference to your final dosa.
- Consistency is Crucial: The batter should be smooth and pourable, akin to a thin pancake batter. If it’s too thick, your dosas will be dense, difficult to spread, and might not crisp up properly. If it’s too thin, they won’t hold their shape on the tawa. Always adjust with a little water, a tablespoon at a time, until you reach that perfect free-flowing yet coating consistency. You should be able to spread a thin layer easily across the hot tawa without it breaking apart.
- Mastering the Tawa Temperature: This is arguably the most important tip for perfect dosas! A well-seasoned cast iron tawa (griddle) or a good quality non-stick pan works best. Heat your tawa over medium-high heat until hot. To test its readiness, sprinkle a few drops of water; they should sizzle vigorously and evaporate quickly. Crucially, before pouring each dosa, lightly oil the tawa, then wipe it with half an onion or a damp, clean cloth to slightly cool it down and ensure even spreading. This specific technique prevents the batter from sticking and helps create those desirable, delicate crisp edges.
- The Art of Spreading: Once your tawa is hot and prepped, pour one ladleful of batter directly into the very center. Immediately, using the back of the ladle, work quickly and confidently to spread the batter in a fast, circular motion outwards from the center to create a thin, even circle. The goal is to make it as thin as possible without tearing. The thinner and more even you spread it, the crispier and more uniform your dosa will be. Practice makes perfect here!
- Don’t Overcrowd the Tawa: Always cook one dosa at a time. This allows you to precisely manage the heat for that single dosa and achieve perfect, even crispness without uneven cooking. Attempting to cook multiple at once often leads to less-than-ideal results. Patience is truly a virtue when making dosas!
- Oil Generously (but not excessively): Once the dosa starts to cook and the edges begin to dry and lift, drizzle a little oil (or ghee for a richer, more traditional flavor) around the edges and over the surface. This fat is essential for crisping up the dosa beautifully and preventing it from sticking as it fully cooks. Use just enough to coat, not to deep-fry.
- Know When to Flip (or Fold): Traditional plain dosas cook primarily on one side. You’ll observe the top surface changing color from wet to dry, and the edges will turn golden brown and begin to lift away from the tawa. For a plain dosa, you typically don’t flip it. If you’re making a filled dosa or desire an extra-crispy finish, you might gently fold it in half or roll it up after it’s cooked through to achieve a perfect golden hue on both sides of the fold.
- Chilling the Beetroot: After you’ve cooked and pureed your vibrant beetroot, it’s absolutely essential to ensure it cools down completely to room temperature before incorporating it into your fermented dosa batter. Adding warm or hot puree could prematurely cook or inhibit the delicate fermentation of the batter, resulting in a denser, less airy, and less tangy dosa. Plan this step accordingly.
- Spice it Right: The beetroot puree isn’t just for color; it’s also a fantastic canvas for flavor. Season it thoughtfully with fresh ginger, green chilies, and a touch of cumin. Adjust these spices precisely to your personal preference. For a milder flavor profile, reduce the number of chilies or remove their seeds. For an extra, aromatic kick, add a pinch of red chili powder. This internal seasoning ensures your dosa is flavorful and exciting even before you add any side dishes.
- Serving Suggestions: These eye-catching Spring Beetroot Dosas are incredibly versatile with accompaniments. They are fantastic with classic South Indian staples like a creamy, fresh coconut chutney, a tangy tomato chutney, or a warm, comforting bowl of sambar. For a quicker, simpler meal, a generous dollop of plain yogurt or a zestful Indian pickle provides a wonderful contrast and balance to the subtle sweetness of the beetroot. Don’t be afraid to experiment with your favorite dipping sauces!
Variations & Substitutions for Your Dosa Adventure
The beauty of Indian cuisine, and especially a dish as versatile as dosa, lies in its adaptability. Don’t hesitate to get creative in your kitchen and tailor this vibrant Spring Beetroot Dosa recipe to your personal taste, dietary needs, or what you have on hand. It’s truly a canvas for culinary exploration!
- Naturally Gluten-Free Goodness: You’ll be delighted to know that this Spring Beetroot Dosa recipe is inherently gluten-free, relying entirely on a fermented batter of rice and urad dal (black gram lentils). This makes it a fantastic option for individuals with celiac disease or gluten sensitivities. However, always be mindful of your accompaniments! If serving with store-bought chutneys or sambar powders, double-check their labels to ensure they are also certified gluten-free, as some may contain hidden wheat derivatives.
- Effortlessly Vegan-Friendly: Just like its gluten-free nature, this dosa recipe shines as a naturally vegan dish. The primary ingredients are plant-based, and the crisping agent during cooking can easily be oil instead of ghee (clarified butter). This makes it an ideal choice for vegan diets or for those looking to incorporate more plant-based meals into their routine. Ensure any side dishes, like coconut chutney, are also prepared without dairy.
- Boost Your Veggie Intake: Want to add even more nutritional punch? Finely grated carrots, zucchini, or even pureed spinach can be skillfully incorporated into the beetroot puree mixture. Ensure these additional vegetables are very finely grated or pureed to maintain the smooth, spreadable consistency of the dosa batter. This is a brilliant way to sneak in extra vitamins and fiber, especially if you have picky eaters at home!
- Customize the Spice Level: For those who crave a fiery kick, feel free to increase the quantity of green chilies in your beetroot puree. You can also introduce a pinch of Kashmiri red chili powder for a beautiful color boost and mild heat, or a dash of black pepper for a different kind of warmth. If you prefer a milder flavor, simply reduce the chilies or remove the seeds before blending.
- Enhance with Aromatic Spices: Elevate the authentic Indian flavors by adding a small amount of finely chopped fresh curry leaves or a pinch of asafoetida (also known as “hing”) to the beetroot puree mixture before blending. Hing offers a unique savory, almost onion-like aroma and flavor. Just ensure your asafoetida is gluten-free, as some brands contain wheat flour as a filler. These additions truly bring out the soul of South Indian cooking.
- Experiment with Batter Blends: While the traditional rice and urad dal combination is perfect, you can subtly alter the texture. Some people like to add a small portion of fine semolina (rawa or sooji) to the soaking mixture to achieve an extra-crispy texture in their dosas. Alternatively, a small percentage of whole wheat flour (atta) can be added for a slightly different texture and increased fiber, though this would, of course, make the recipe no longer gluten-free.
- Transform with Savory Fillings: Turn your Spring Beetroot Dosa into a hearty meal by filling it! A classic choice is a spiced potato masala (aloo masala), but you could also use scrambled paneer (Indian cheese), a mixture of sautéed vegetables, or even a spicy lentil filling. Simply spread your desired filling onto the cooked dosa before folding or rolling it up. The vibrant color of the dosa contrasts beautifully with savory fillings.
Storage & Freezing Tips for Freshness
Ensuring your delicious Spring Beetroot Dosas or their batter stay fresh means you can enjoy them anytime. Proper storage is key for convenience and taste!
Storing Dosa Batter:
- In the Refrigerator: Once your batter has fermented, transfer it to an airtight container and store it in the refrigerator. It will stay fresh and usable for up to 3-4 days. The fermentation process slows down considerably in the cold, but the batter will continue to subtly ferment, so it might become a little tangier over time. This can actually enhance the classic dosa flavor!
- For Longer Storage (Freezing Batter): Yes, you can absolutely freeze dosa batter for future use! Pour the properly fermented batter into freezer-safe bags or containers, ensuring you leave about an inch of headspace as it might expand slightly during freezing. Freeze for up to 1-2 months. When you’re ready to make dosas again, thaw the batter in the refrigerator overnight. You might need to whisk it well and add a splash of water to adjust the consistency after thawing, as it can thicken. A slight re-fermentation at room temperature for an hour or two might also be beneficial if it seems sluggish, helping to reactivate the cultures.
Storing Cooked Dosas:
- Fresh is Best: It’s widely agreed that dosas are truly at their peak when enjoyed fresh off the tawa, while they are still wonderfully hot and crispy.
- Short-Term Storage: If you happen to have any leftovers, allow them to cool completely to room temperature before storing. Stack them carefully with parchment paper in between each dosa to prevent sticking, and then place them in an airtight container in the refrigerator for up to 1-2 days. This method helps maintain some of their texture.
- Reheating Cooked Dosas: To bring leftover dosas back to life, gently reheat them on a warm, dry tawa or a flat pan for a minute or two until they are warmed through and regain some of their crispness. While they might not be as perfectly crisp as freshly made ones, they will still be deliciously satisfying. Avoid microwaving, as it tends to make them soft and chewy.
- Freezing Cooked Dosas: While technically possible, freezing cooked dosas is generally not recommended if you prioritize that signature crisp texture. Cooked dosas tend to lose their delicate crispness and can become a bit chewy after freezing and thawing. If you must freeze them, cool them completely, layer with parchment paper, and freeze in an airtight container. Reheat very carefully in a pan or toaster oven for best results.
Frequently Asked Questions About Spring Beetroot Dosa
Q: Can I use pre-made dosa batter for this recipe?
A: Yes, you absolutely can and it’s a fantastic time-saver! To adapt this recipe for pre-made batter, simply prepare your vibrant beetroot puree first (cook and blend the beetroot with ginger and chili until very smooth). Then, gradually stir this concentrated, colorful puree into your store-bought dosa batter until fully combined and the color is uniform throughout. You might need to adjust the batter’s consistency slightly with a tablespoon of water if the beetroot puree makes it too thick. This shortcut allows you to enjoy these beautiful dosas even on your busiest days!
Q: What if my dosa batter isn’t fermenting?
A: Several factors can affect successful dosa batter fermentation. First, ensure your urad dal and rice are fresh; older ingredients may have less active natural yeasts. Second, temperature is absolutely critical; a warm environment (ideally around 75-85°F or 24-30°C) is perfect. If your kitchen is cold, try placing the batter container in an oven with just the light on, or near a sunny window. Avoid over-salting initially, as too much salt can inhibit the beneficial bacteria needed for fermentation. Lastly, ensure you haven’t used chlorinated tap water directly, as chlorine can kill these essential microorganisms – consider using filtered water or letting tap water sit out for an hour to allow chlorine to dissipate.
Q: How do I get my dosas perfectly crispy and thin?
A: Achieving that coveted crispy, paper-thin dosa involves a few key techniques. Ensure your batter is of the right, pourable, thin consistency – thicker batter makes soft dosas. Use a very hot tawa (griddle) that is then lightly cooled with a damp cloth or a piece of onion before pouring each dosa. This cooling helps the batter spread evenly without sticking immediately. Spread the batter thinly and quickly from the center outwards using the back of a ladle. Finally, don’t skimp on the oil (or ghee) around the edges as it cooks; this fat is crucial for creating those irresistible golden, crisp edges. Patience during cooking is also vital!
Q: Can I make the beetroot puree ahead of time?
A: Absolutely, making the beetroot puree in advance is a smart time-saving strategy! You can cook and puree the beetroot mixture (with the ginger and chili) a day or even two days in advance. Store it in an airtight container in the refrigerator. Just be sure it’s completely cooled to room temperature before you mix it into your fermented dosa batter. This pre-prep can significantly cut down on your active preparation time on the day you plan to cook your delicious Spring Beetroot Dosas.
Q: What are the best side dishes for Spring Beetroot Dosa?
A: These vibrant and flavorful dosas pair beautifully with a range of classic South Indian accompaniments, enhancing the overall dining experience. My personal favorites include a creamy, fresh coconut chutney (a must-try!), a tangy and subtly spicy tomato chutney, and a comforting bowl of warm, aromatic sambar (a flavorful lentil and vegetable stew). For a quicker and simpler side, a generous dollop of plain, unsweetened yogurt or a zestful Indian pickle also works wonderfully to complement the subtle earthy sweetness of the beetroot and add a refreshing contrast.
Time to Get Cooking!
There you have it – your guide to creating the most beautiful and delicious Spring Beetroot Dosas. Whether you’re a seasoned chef or just starting your culinary journey, this recipe is designed to bring joy and vibrant flavors to your table. Don’t forget to share your creations with me!
Pin this recipe for later and let me know in the comments when you make it. Happy cooking!
Vibrant Spring Beetroot Dosa: Easy Indian Breakfast Recipe
Ingredients
- 1 cup raw rice (e.g., idli rice or parboiled rice)
- 1/4 cup urad dal (split black gram, skinless)
- 1/2 tsp fenugreek seeds (optional, for fermentation)
- 1 medium beetroot, peeled and roughly chopped
- 1 inch ginger, roughly chopped
- 1-2 green chilies (adjust to taste)
- Salt to taste
- Water for soaking and grinding
- Oil or ghee for cooking dosas
Instructions
- Step 1 Soak rice, urad dal, and fenugreek seeds separately in water for 4-6 hours.
- Step 2 Drain water from rice and dal. Grind dal first with a little water until very smooth and fluffy. Remove and set aside.
- Step 3 Grind rice with a little water until smooth. Add to dal batter.
- Step 4 Steam or boil chopped beetroot until tender. Let cool completely.
- Step 5 Blend cooled beetroot with ginger and green chilies, adding minimal water, to form a smooth puree.
- Step 6 Mix beetroot puree into the dal and rice batter. Add salt. Mix well with your hands (this aids fermentation).
- Step 7 Cover and let the batter ferment in a warm place for 8-12 hours, or until it has risen and looks bubbly.
- Step 8 Once fermented, gently stir the batter. If too thick, add a tablespoon or two of water to reach a pourable consistency.
- Step 9 Heat a tawa (griddle) over medium-high heat. Lightly oil and wipe with a damp cloth or onion half.
- Step 10 Pour a ladleful of batter in the center and spread outwards quickly in a circular motion to form a thin dosa.
- Step 11 Drizzle a little oil or ghee around the edges. Cook until the edges turn golden brown and crisp, and the center is cooked through.
- Step 12 Remove from tawa. Serve hot with chutney and sambar.